Let's Build: Instagram (With Ruby on Rails) - Part 1 - Just CRUD Things
30 June 2015
So you’re done playing in the treehouse or you’ve completed your codeschool. You’ve been high-fiving Odin or your coding academy has kicked you out. What now?
Now you build lots of awesome things and get great at what matters (and therefore what employers want).
Follow along and together we’ll build awesome applications that will build your competence through glorious repetition and embracing the skills that employers want. The whole goal of next step rails is to get you job-ready or plain old awesome at building valuable features with Rails.
You might notice something else, there are two versions of each tutorial. One is test-driven (the industry standard for Rails development) whereas the other just lets you stumble blindly into the depths without a test to be seen.
Why?
Because testing is super daunting for the novice, and let’s be honest, you need to actually understand some underlying Rails and Ruby infrastructure before you know what to test.
SO!
If you’re wanting to learn how to test (a standard for 99% of Rails jobs) I’ll be releasing a TDD version of this guide in a few days time. I’d recommend you complete this guide as per this version and then try your hand at testing, it’ll make much more sense!
Sign up to Devwalks at the bottom of this post to be notified once the TDD guide is complete.
One final note, I want you to know that these guides don’t hold your hand unless you really need it. Everytime you see this image:

You should attempt to do the action yourself or find out how. Only scroll further once you’re happy with your attempt.
These guides are written for those who’ve already completed a few tutorials, meaning there’ll be much more value in building the application yourself wherever possible. Google for answers before you reveal them here, read the docs, explore and discover! Your learning experience will be that much better for your struggle.
Oh yeah, because these guides expect that you’ve completed tutorials prior, you should already have Ruby on Rails setup on your computer.
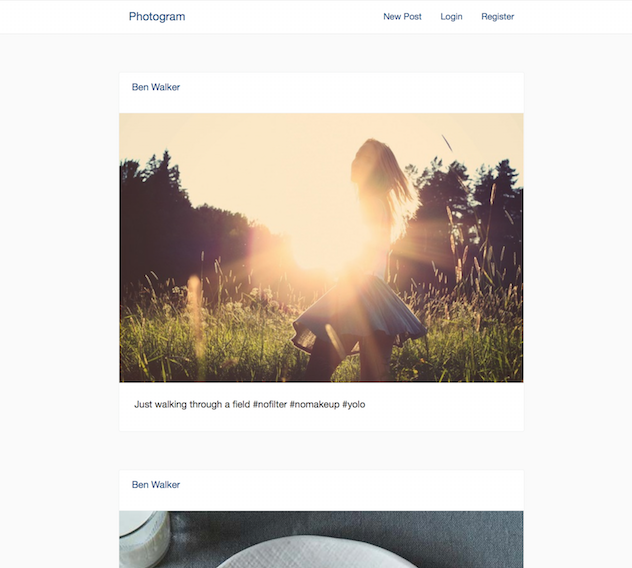
Alright, let’s start building our Instagram clone!. This is what it’ll look like at the end of this tutorial:
Let’s build it!
You are a Creator
Let’s create our project. I’m going to call mine Photogram but feel free to be creative and call it something else. I want this project to belong to you.
Jump in your terminal and cd to where you want to create your project.
Now use the rails command for creating a new project and we can begin with style.
Can’t remember how to create a project in the terminal?
rails new PhotogramNow cd to your new directory and let’s run the server to see if we’ve got rails working properly.
Can’t remember how to run a rails server?
bin/rails s OR
bin/rails serverUse the first option if you want to be a super-efficient bad ass.
You should see this screen as a friendly reminder that you’re awesome:
You are by the way ;)
CRUD!
Let’s start building our application. Remember, the TDD version of this is coming and I don’t want you to risk being too incredible just now. That and I want you to have a great foundation from which to learn to test.
Let’s be cowboy devs for the moment.
This part of the guide will deal with handling the base of Photogram, the creation, editing and deletion of individual posts and their images. We’re not going to use scaffolds here because we want to build competency and understand how the bits work.
First, initiate your git repository in your current directory and commit your project thus far using the message “Initial commit”.
Git what?
You should already have git installed on your machine, if not, look here. To run the init command, make sure you’re in the project directory on your development machine and run the following command:
git initYou now have a brand new, empty repository!
Commit your current progress (your new project) by running:
git add . #To add all changed files

git commit –m 'Initial commit' #To commit your changes with a message
Every time you see the git symbol in this guide, you should consider a commit. I’m not going to push the matter because you’re an adult and you know best.

That’s an octocat by the way.
Back to the build you fiend!
If you were test driving this application, the first thing it’d complain about is the simple fact that nothing of value exists at our root route (localhost:3000/ for the moment).
To remedy the situation, we’re going to need to create a controller that will handle the index, create, read, update and delete actions for our posts and then direct our routes.rb file to the index action of that controller.
Let’s generate a controller and call it posts. Do that now in your terminal.
Need a hand, friend?
bin/rails g controller postsNow, let’s navigate over to our newly created controller posts_controller.rb and add a controller action. First, let’s create our index action with no contents.
Need another hand?
def index
end
Our routes for our posts controller are going to be standard Rails RESTFUL routes. Rails let’s us simplify the routing in this scenario by using “resources”. Create a resources route for the posts controller in your routes.rb file now.
Resource Shmesource
That is terrible English. Just awful. Insert the below into you routes.rb file.
resources :postsRails is going to want you to have a view associated with our brand new index action. Do that now by creating a new view called index under the posts folder at app/views/posts.
I’m a fan of using HAML instead of the standard erb format but this is entirely optional ( I honestly do believe it’s worth your time learning though). If using HAML, call your file index.html.haml, otherwise call it index.html.erb.
If you do decide to go the HAML route, you’ll need to add the haml gem to your gemfile and run the bundle command in your terminal (and restart your server). Read more about haml here.
As for our application, let’s keep our new view nice and static for the moment and just add a title. Create a h1 tag in your html and call it whatever you called your application. In my case, it’s Photogram.
Haml version:
%h1 PhotogramNow we have a functional index view, let’s set the index action in the PostsController to be our root route within routes.rb.
Add the following line to your routes.rb file.
root 'posts#index'Load up your server again, navigate to the root route and gaze upon the beauty that is your application. This is our MVP (just kidding). Isn’t she beautiful?
No it’s not, it’s awful.
We’ll get back to actually having something of value in our index but for the moment, let’s actually create some posts for our index (and therefore root route) to display.
First, a database!
We’re going to need to generate a model in terminal to store our posts, including caption and image. Let’s create the model “post” with only a string column for “caption”. We’ll add the image functionality in a moment.
Show me how, I dare not create a model all by myself!
bin/rails g model Post caption:stringNow that we’ve created the migration files for our database we need to migrate those changes. Run the Rails db migrate command in your terminal.
I forget stuff sometimes!
bin/rake db:migrate
Let’s now add the image uploading functionality through a super fabulous gem called paperclip.
Click here to read about how to implement the gem in your project. I want you to set up your project with paperclip as per their instructions, their documentation is about as good as it gets.
If you don’t trust yourself, read the hidden section below but I implore you to do it yourself and continue without reading it. If you run into trouble in the next step it’ll be a good exercise for you in troubleshooting!
Please help with the Paperclips!
First things first, as per the docs, you’ll need imagemagick running on your development computer. Set it up as per the instructions here.
Next we’ll add the paperclip gem to our gemfile as per their docs.
gem 'paperclip', '~> 4.2' #at the writing of this postRead the next bit of the docs, what does it ask you to do now?
I can’t read well.
Alright, let’s add has_attached _file to our Post model.
class Post < ActiveRecord::Base
  has_attached_file :image
end
As per the docs (and a fantastic comment in the comments section) you’ll also need to run the rails migration generator in your terminal with:
bin/rails g paperclip post imageHow good are these docs!
Alright, we’ve now got paperclip ready to use on our Post model and we’ve got the ability to add captions to our selfies and cat pics. Now, let’s make sure we’re on the same page.
If you’ve setup Paperclip yourself, just know that I’ve used the following code in my application. (spoiler alert)
Model
class Post < ActiveRecord::Base
  validates :image, presence: true

  has_attached_file :image, styles: { :medium => "640x" }
  validates_attachment_content_type :image, :content_type => /\Aimage\/.*\Z/
end
The styles in the Post model should make sense. We’re simply re-sizing any image that we accept to the Instagram normal: 640px wide. We’ll let people post tall images though.
Also note one other thing that I’ve done differently compared to the Paperclip docs. I’ve set a validation that I need an image to be submitted in that form. This is an image sharing social site after all. This then negates the need for a default “image missing” image.
As part of this process you should’ve generated a migration file and migrated it using bin/rake db:migrate. If your server is still running, you may have to restart it.
We can now officially handle image uploads, give yourself a high ten and commit your changes with git.
Out with the old in with the new action
Create a new empty action in your posts_controller.rb file called ‘new’, exactly the same as you did earlier with the index action.
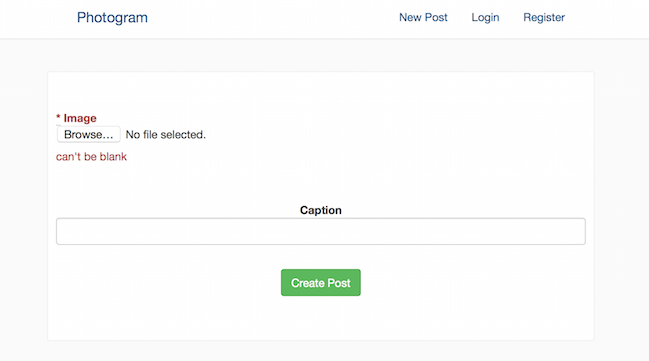
Once again, we’ll need a view for this action, so let’s create a new file under views/posts/new.html.haml (or .erb you sicko). As part of our new view, we’re going to need to create a form that will accept the users caption and image.
A popular Rails gem for form building is simple_form. I’ll personally be using this on my new view to create the form. Once again, head over to the simple_form repo here and read the docs.
Now construct the form for our purposes.
Not sure how to add the image upload functionality? I’ll give you a hint, go back and check the Paperclip docs again.
If you’re still struggling, that’s ok, just do what you can and then read the answer below. Create your new view under app/views/posts and call it new.html.erb or new.html.haml and build the form there.
Oh god, Please tell me, how do I create the form with simple_form?
First you’ll need to add the simple_form gem to your gemfile as below:
gem 'simple_form', '~> 3.1.0'Next run bundle in your terminal to incorporate it into your project. You may need to restart your server or it’ll potentially throw an error when you try to navigate to your form.
Now you should be able to start creating your form in your new view! Follow along with the simple_form docs.
Here’s a haml example. You should be able to translate this back to erb if required.
= simple_form_for @post do |f|
  = f.input :image
  = f.input :caption
  = f.button :submit
Simple_form needs to know the purpose of this form via an instance variable from the appropriate action in our controller. In this case, we want to create a new post. Add the @post variable to the new action.
def new
@post = Post.new
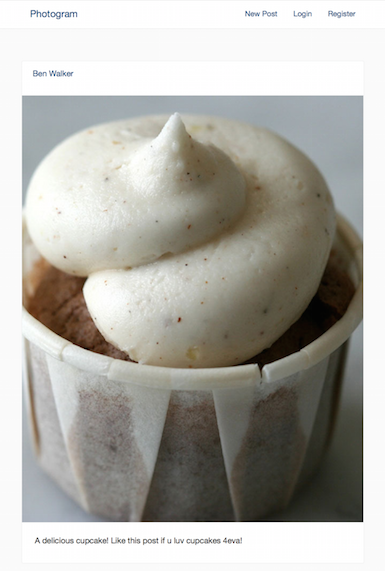
endNow we have a form that we can view on our local server. With your server running, navigate to localhost:3000/posts/new in order to look at your creation.
Even though it’s ugly, I assure you it’s very functional!
Let’s try submitting our first post with any old offensive image you can find on your computer.
We seem to be getting this:
The action ‘create’ could not be found for PostsController
Ok, that’s pretty clear as to what we need to do. Let’s create an empty ‘create’ action in our posts controller. This is exactly the same as our other two actions so there’ll be no hints this time.
Let’s try submitting again.
Hmmm, it’s asking for a template but we don’t really want to create a template for the create action, we want it to be a “behind the scenes” type action, one that saves the data in our form to the database and then sends us on our merry way.
Let’s write some code that will save the data from the form to our database. You’ve probably done this before but it’s easy to forget.
Show me how!
We want to use the create method on the Post model, using the data in our form for submission.
def create
  @post = Post.create(post_params)
end
We’re using post_params as an argument to the create method so we’d better define that somewhere too. post_params will be a private method, ie. it can’t be called from outside this class.
Here we can define the exact data we want to accept as the parameters in our form. In this case, our image and our caption text. Insert the following code below your other actions.
private

def post_params
  params.require(:post).permit(:image, :caption)
end
Now that the information is being saved in the create action, we need to redirect the user to somewhere useful. Let’s send them back to the index action for the time being with the redirect_to method.
What is this magic?
Add the following code to the bottom of your new action.
redirect_to posts_pathWhich makes our create action look like:
def create
  @post = Post.create(post_params)
  redirect_to posts_path
end
Alright, let’s try to submit the form again. Navigate back to localhost:3000/posts/new, add your picture and your optional caption and submit!
Finally, we’ve avoided errors! But wait, where the hell is your post? Let’s quickly set it up now. To make sure our post even exists, jump into your terminal and run your rails console.
I forget how…
bin/rails cNow try to find that post we submitted using your ruby and rails skills.
I’ve lost all my Ruby skills in a freak water slide accident…
Let’s assign the very first post in the Post model to the variable “post”.
post = Post.firstAnd look at what’s returned! Our submitted post, complete with caption and image path!
Right then, now that we know that we’re actually saving something, let’s get ALL of our posts that will be submitted now and in future onto our index path in a big beautiful stream of visual delight.
Create an instance variable under your index action that collects all of the posts in your Post model. This will let us display all of our posts in our index view!
Please explain this “variable”…
It’s easy peasy!
Let’s call our instance variable @posts. All we then want to do is capture all of the posts in the Post model!
def index
 @posts = Post.all
end
Once you’ve done this, we want to iterate over each post in that collection and display it for our viewing pleasure. We’ll need to do this in the index view. Do your best to iterate this collection using a simple block, outputting the captions and the images.
A very simple haml version of this is seen here if you need a hand:
-@posts.each do |post|
  =post.image
  =post.caption
If we refresh our index, all we’re getting is a crappy image path on each post. Let’s use rail’s image_tag helper to actually output our image. You can read up on it yourself here or you can see how to implement this the easy way below.
I don’t trust your dodgy links, show me the easy way!
Replace post.image with the below line.
=image_tag post.image.url(:medium)
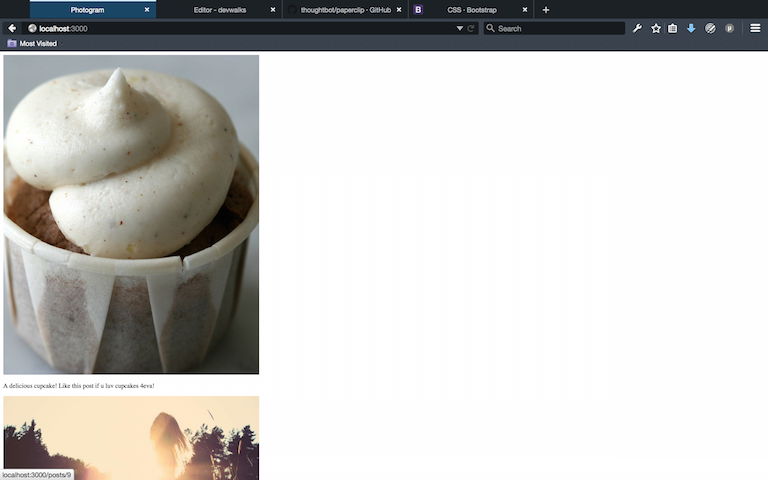
Now navigate to your index page (http://localhost:3000) and….
Oh my god. Look at it.
What an incredible achievement. It’s not super functional yet though, I can’t even submit a new post without manually navigating to /posts/new and we might want to be able to edit or delete our posts in case we upload a picture of our reproductive organs (accidentally).
Being able to show individual posts would be nice too but that can all wait because I’m sick of this thing looking awful.
Styling: Let’s steal like an artist or something
Let’s blatantly steal from Instagram, for this is an Instagram clone tutorial after all!
Instagram has recently revamped their desktop site so I’m just going to do that. BUT to make it easier I’m going to use the CSS framework, Bootstrap as my foundation. Install the bootstrap gem found here in your gemfile as per their docs.
You’re getting lazy.
gem 'bootstrap-sass', '~> 3.3.5'Make sure to run “bundle” in your terminal, follow the steps in their docs as far as adding lines to your application.css file (and renaming it to .scss) and adding a line to your application.js file.
Restart your server and you should be good to go. Refresh your index and things look almost exactly the same because we literally had NO styling whatsoever. The h2 looks a bit different which is a nice touch.
Now, let’s add a navbar up top and move our company name up there. Look at the bootstrap docs here. It’s almost a matter of exactly copying over their suggested navbar and adding it to your layout.html.erb(or .haml) file.
If you’re using haml be prepared to translate. I’ve deleted some extra bits that we won’t need below (I’ve also added some extra bits so make sure to have a peek):
%nav.navbar.navbar-default
  .navbar-container
    .navbar-header
      %button.navbar-toggle.collapsed{"data-target" => "#bs-navbar-collapse-1", "data-toggle" => "collapse", type: "button"}
        %span.sr-only Toggle Navigation
        %span.icon-bar
        %span.icon-bar
      .navbar-brand= link_to "Photogram", root_path
    .collapse.navbar-collapse#bs-navbar-collapse-1
      %ul.nav.navbar-nav.navbar-right
        %li
          = link_to "New Post", new_post_path
        %li
          = link_to "Login", '#'
        %li
          = link_to "Register", '#'
I’ve added this to the application.html.haml view under views/layouts/ because this is shown in ALL of our views. This means we don’t have to add the navbar to everything! Huzzah!
Please note that I’ve added a “New Post” button that links to our new Post action/ route AND the Photogram logo links to the index. Genius.
Let’s give each of our individual posts their own full-width row using the bootstrap divs. Remember, try to do it yourself first.
I just want to see how you did it…
-@posts.each do |post|
  .row
    =link_to (image_tag post.image.url(:medium)), post_path(post)
    %p= post.caption
Refresh your index page and bask in the glory that is your photo feed.
But it still doesn’t look like the Instagram feed…
Let’s change that now. First let’s add our own classes to the html on our index view. This section won’t be hidden because it’s kind of hard to implement this yourself. If you want the challenge or have the CSS / HTML ability to do so, please do so now. Simply steal Instagrams styling cues and plop them in your application.css and index.html.haml / .erb files!
My implementation looks like this in my index view:
.posts-wrapper.row
  -@posts.each do |post|
    .post
      .post-head
        .name
          Ben Walker
      .image.center-block
        =link_to (image_tag post.image.url(:medium), class:'img-responsive'), post_path(post)
      %p.caption
        =post.caption
And my CSS (for the rest of this project) looks like this:
body {
  background-color: #fafafa;
  font-family: proxima-nova, 'Helvetica Neue', Arial, Helvetica, sans-serif;
}

.navbar-brand {
  a {
    color: #125688;
  }
}

.navbar-default {
  background-color: #fff;
  height: 54px;
  .navbar-nav li a {
    color: #125688;
  }
}

.navbar-container {
  width: 640px;
  margin: 0 auto;
}

.posts-wrapper {
  padding-top: 40px;
  margin: 0 auto;
  max-width: 642px;
  width: 100%;
}

.post {
  background-color: #fff;
  border-color: #edeeee;
  border-style: solid;
  border-radius: 3px;
  border-width: 1px;
  margin-bottom: 60px;
}

.post-head {
  height: 64px;
  padding: 14px 20px;
  color: #125688;
  font-size: 15px;
  line-height: 18px;
  .thumbnail {}
  .name {
    display: block;
  }
}

.image {
  border-bottom: 1px solid #eeefef;
  border-top: 1px solid #eeefef;
}

.caption {
  padding: 24px 24px;
  font-size: 15px;
  line-height: 18px;

}

.form-wrapper {
  width: 60%;
  margin: 20px auto;
  background-color: #fff;
  padding: 40px;
  border: 1px solid #eeefef;
  border-radius: 3px;
}

.edit-links {
  margin-top: 20px;
  margin-bottom: 40px;
}
Whether you’ve copied me or stolen it yourself, it’s time to refresh your index page and look!
I don’t like to give myself too much praise but this is looking pretty bad-ass now. Personally, I much prefer working on a site that looks good. It’s my inner artist coming out.
Let’s quickly tidy up our new post view and form.
Once again, feel free to do this yourself. Keep in mind that Instagram is a mobile app primarily so you can’t actually post photos from your browser. For this reason, you might want to copy my code below, but first, you should try to simply add the bootstrap classes to your form so it looks like the bootstrap standard seen here and then decide on updating styling from there. My version looks like this in the view:
.form-wrapper
  = simple_form_for @post, html: { class: 'form-horizontal', multipart: true } do |f|
    .form-group
      = f.input :image
    .form-group.text-center
      = f.input :caption
    .form-group.text-center
      = f.button :submit, class: 'btn-success'
Navigate to the new view if you haven’t already and admire your handy work. I’m still not not super happy with the way this form looks but it’ll do for the moment.
Let’s keep building the apps functionality now.
Show me a single post you silly application!
Hey, you talk to Photogram nicely please.
Let’s create the ability to show a single post (and later on, all the associated comments & likes with that post.)
First create a show action in your PostsController. You know how to do this by now. We want this action to have a @post instance variable that points to the specific post we’re referring to.
def show
  @post = Post.find(params[:id])
end
Now let’s fiddle with the image_tag on our index view so that each image will link to the appropriate post!
Combining image_tag and link_to tags will be commonplace in your rails career, work out how to do it via google searches before cheating below.
Adjust your image tags to include the link_to helper.
=link_to (image_tag post.image.url(:medium), class:'img-responsive'), post_path(post)This will let us click our images in order to take us to the individual post. This takes us one step closer to pure Instagram forgery.
The only issue? We don’t have a view for our show action. Create one now that shows us the same information that can be seen on our index view. The only difference is that we won’t be iterating over many posts, we’re just referring to one.
It’s so similar to the index!
.posts-wrapper.row
  .post
    .post-head
      .name
        Ben Walker
    .image.center-block
      =image_tag @post.image.url(:medium)
    %p.caption
      =@post.caption
    .text-center
      =link_to "Cancel", posts_path
Now you should have the ability to click one of your posts on the index and it should take you to the individual post!
Let me edit my posts, I’ve made a horrible mistake
We all make mistakes but at least we can fix this one for you. Take a moment and have a think about what we’re going to need to do to implement this. In fact, you’ve probably done this before in your previous applications!
We’re going to need some extra actions in our controller…..
We’re going to need a view with a form to update our post…..
Give it a go yourself. Hint: You’re going to need two extra actions in your posts controller and only a single view (It will look very similar to your new and create actions). Refer to your old tutorials if you have to, it’ll be much more useful than me holding your hand through it.
But your hands are so moist…
Oh you.
Just like the creation of posts needs a new action and a create action, editing our posts will need an edit action and an update action. Create both an empty edit action and an update action in our posts controller, just like we have many times before with other actions.
def edit
end

def update
end
Now let’s add some logic to the actions. For the sake of the form, we want to include an instance variable that refers to the specific post we’re looking at.
Update edit to include the instance variable below.
def edit
  @post = Post.find(params[:id])
end
And now, we need to actually perform an update that touches our database (not in a creepy way). It’s very similar to our create action but rather than creating, we’re UPDATING! Let’s make magic.
def update
  @post = Post.find(params[:id])
  @post.update(post_params)
  redirect_to(post_path(@post))
end
And last but not least, let’s create a view for our edit action along with a form. Call this view edit.html.haml (or .erb) and ensure it’s residing in the same location as your other post views.
The form within this view will be exactly the same as that used in your new action, so copy and paste the form from your new view to your edit view.
We have two shiny new actions in our posts controller and a brand spanking new form in our edit action. Before I continue though, I’d like to add an image to the edit view as well.
I simply want to display the existing image being used for the post. Look at how you display your image in your index view and use the same method in your edit view to display it.
I just want to be sure I’m doing it right…
It’s OK, I trust that you’re doing your best. Simply add a centered div and an image_tag.
.text-center
  = image_tag @post.image.url(:medium)
.form-wrapper
  = simple_form_for @post, html: { class: 'form-horizontal', multipart: true } do |f|
    .form-group
      = f.input :image
    .form-group.text-center
      = f.input :caption
    .form-group.text-center
      = f.button :submit, class: 'btn-success'
Oh yeah, we’re going to need to link to our edit action from our show view, let’s quickly add the following code to the bottom of our show view.
.text-center.edit-links
  = link_to "Cancel", posts_path
  |
  = link_to "Edit Post", edit_post_path(@post)
This will be just under our caption.
That looks a bit better! What if editing alone isn’t enough to reverse our terrible actions?
Please Let me delete my nude selfies.
OK, but you should know that I’m not happy about it (I think you look great in those chaps). Deleting is super simple and can be fleshed out nice and quickly. First you’ll need to create a destroy action in your posts controller that deletes the specific record and then you’ll need to link to that action on your index view with the addition of a :destroy method. Then we want to redirect back to the index.
Simply create a link on the edit page for now so all of our users can delete each-others posts at will (We’ll fix this later I promise, this is a terrible idea). Go forth and destroy!
First our destroy action in posts_controller.rb
def destroy
  @post = Post.find(params[:id])
  @post.destroy
  redirect_to posts_path
end
And our simple link to that action with a warning on our edit view:
# Add this to the bottom of your edit view.

.text-center.edit-links
  = link_to "Delete Post", post_path(@post), method: :delete, data: { confirm: "Are you sure you want to delete this post?" }
  |
  = link_to "cancel", posts_path
It’ll look like this, which is perfect!
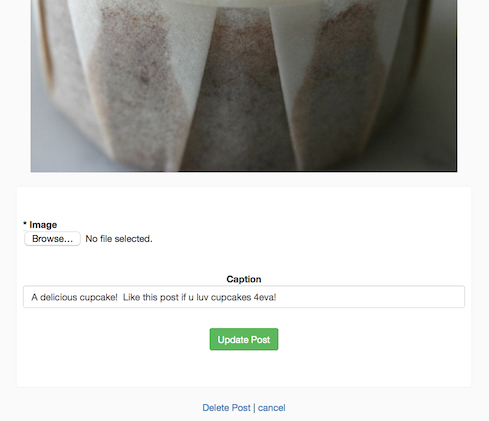
And it’s done! Try deleting one of your pics now and see what happens.
Tidy tidy tidy
Basic functionality has been created, let’s clean up a little before we finish for the moment.
DRYing up
First, we’re repeating ourselves with our edit and new forms, let’s move that code into a partial and call it _form.html.haml (or .erb). Copy and paste the form code onto the new _form.html.haml view. Delete that repeated code in both new and edit and then add the following line to both:
= render 'form' Remember how the forms differ though, our edit form has the image displayed where the new form does not. Ensure you keep the image in the edit form and add the partial render below that.
Where else are we repeating ourselves? The controller!
Let’s create a private method that sets the post that we’re trying to identify using the id parameter. Create a new private method called set_post that finds the specific post we’re looking for by the id parameter and assigns it to the instance variable @post. Pro-tip, we’re using it in a couple of our controller actions already.
Now we can add a before_action to the top of our controller to set the @post variable for specific actions. This looks like this:
before_action :set_post, only: [:show, :edit, :update, :destroy]Go ahead and create the set_post private method now.
I wanna check yours…
Well, here’s an overview of my PostsController so far.
class PostsController < ApplicationController
  before_action :set_post, only: [:show, :edit, :update, :destroy]

  def index
    @posts = Post.all
  end

  def show
  end

  def new
    @post = Post.new
  end

  def create
    if @post = Post.create(post_params)
      redirect_to posts_path
    else
      render :new
    end
  end

  def edit
  end

  def update
    if @post.update(post_params)
      redirect_to posts_path
    else
      render :edit
    end
  end

  def destroy
    @post.destroy
    redirect_to root_path
  end

  private

  def post_params
    params.require(:post).permit(:image, :caption)
  end

  def set_post
    @post = Post.find(params[:id])
  end
end
Now that you’ve got the before action, you can delete each instance variable that achieved the same thing! Refer to my code above :).
Useful and Legal Flashing
I want to achieve two things here, I want to flash the user a message upon completing an action and I also want a fall-back if for some reason, the action couldn’t be completed.
First, let’s create the plan B if something goes wrong when submitting a form.
Create a simple if / else statement in your create block that reads like this for your index. If your post is successfully created, redirect to the index page, else render the new page. Your update action will be similar but it’ll ask, if your post is successfully updated, redirect to the index page, else render the edit page.
What does this look like?
  def create
    if @post = Post.create(post_params)
      flash[:success] = "Your post has been created!"
      redirect_to posts_path
    else
      flash.now[:alert] = "Your new post couldn't be created!  Please check the form."
      render :new
    end
  end
AND
  def update
    if @post.update(post_params)
      flash[:success] = "Post updated."
      redirect_to posts_path
    else
      flash.now[:alert] = "Update failed.  Please check the form."
      render :edit
    end
  end
We can implement ‘flashes’ into our layout/application.html.haml file with the following code :
  .container
    -flash.each do |name, msg|
      = content_tag :div, msg, class: [:alert, alert_for(name)]
    = yield
Also add the following code to your app/helpers/appication.rb in order to include the styling cues from Bootstrap.
def alert_for(flash_type)
  { success: 'alert-success',
    error: 'alert-danger',
    alert: 'alert-warning',
    notice: 'alert-info'
  }[flash_type.to_sym] || flash_type.to_s
end
Full credit to suslov on Stack Overflow for this bit of code.
Also, when our users create a new post, edit a post or delete a post, they’re not notified of whether what they’ve done was successful or unsuccessful and this doesn’t lead to a great user experience. Let’s add some friendly messages that’ll be rendered in our user’s browsers upon completing an action.
Start from the top action in your controller and work your way down, ask yourself if the user should be told something once that specific action is complete. Create the flash message using the following code and insert it just prior to the redirect or render. If using the render method, adjust the flash message to flash.now:
flash[:success] = “Your personalised message here”If there’s a failure scenario, adjust slightly to this:
flash[:alert] = “Oh god something is wrong”(or a version of that that is actually useful to the user).
The End (for a brief moment)
You have now created a great CRUD application that looks pretty snazzy, but we’re still missing a few things I’d like to see. Users with authentication, comments and likes to be specific. Maybe even a profile page for each user.
Check your final product of part 1 against mine here.
Let’s build out the user functionality and comments next time!
Want to try building Photogram with industry standard TDD? I’ve since written that article here.
Happy with your progress but want to add users, ownership and comments to your application? We do just that in part 2.
Want to be notified when the future parts are complete or when the next Let’s Build project begins? Do you want to keep building beautiful applications and build your confidence as a developer? Sign up now.