Let's Build Instagram Part 3 -Fabulous Forms & Pleasant Pagination
08 August 2015
Welcome back to next installment of Let’s Build Instagram! New here? Well you’ve missed a bit by this point. So far, we’ve already built:
- CRUD actions for our posts, each with an image and caption.
- User functionality with registration and sign-in forms. Also, Adding comments to posts via AJAX.
- The associated testing handbooks for Part One - CRUD & Part Two - Users & Comments.
If you’re interested in building a beautiful, feature packed Rails application from the ground up, I highly recommend you start with those. If you want to start part way along for some sick and twisted reason, the git repo for the project can be found here. Look through the commits to find specific points throughout the tutorials.
As for this guide, we’re going to go side-step a little from adding more features. Instead, we’re going to improve on what we already have.
Here’s what we’re going to implement this time:
- We’re going to beautify ALL of our forms. This includes: registration, sign up, post creation, post editing. Why? Because we can do better dammit.
- We’re going to paginate our main news feed so our server doesn’t explode with new visitor to the feed.
- We’re going to limit how many comments are shown on an individual post, before we expand them with a ‘view all comments’ link. This is similar to how Instagram handles it and I’m in too deep with plagarism to change now.
Now that you’re primed for an incredible learning experience, let’s get into it. Brace yourself.
Our Forms are awful
Look at this, just look at it:
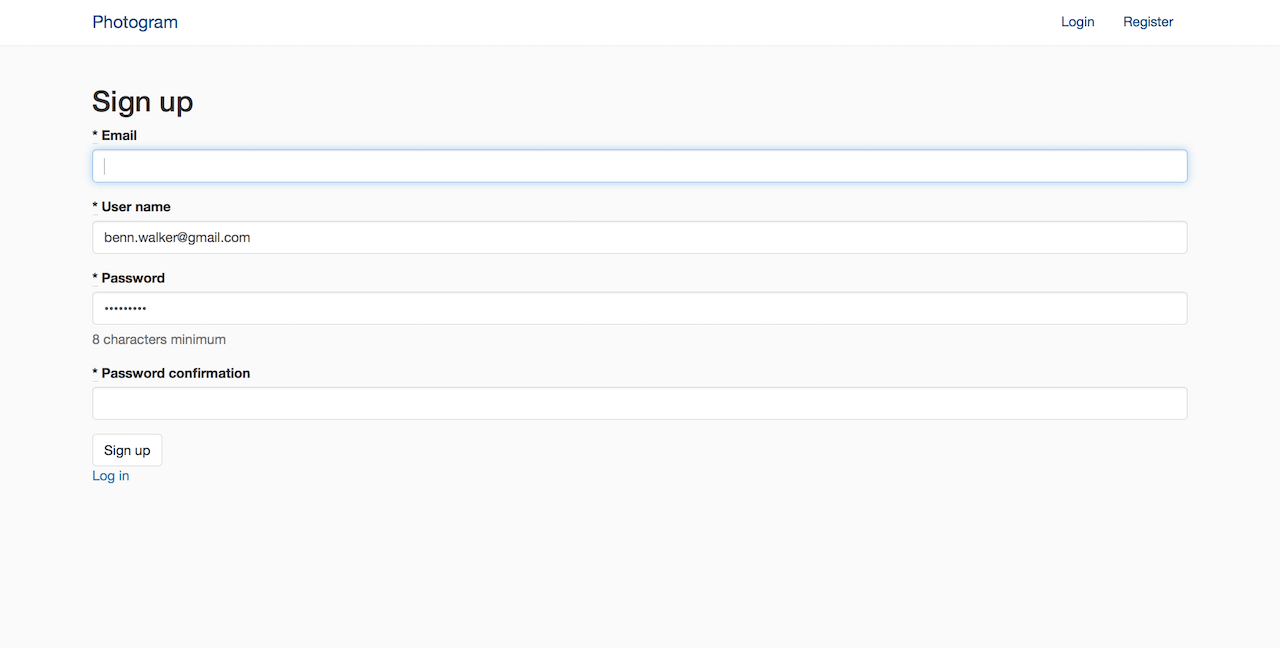
This is our so-called signup page. Who would want to sign up to this? I have no idea. Probably some sort of monster.
Now, look at this:
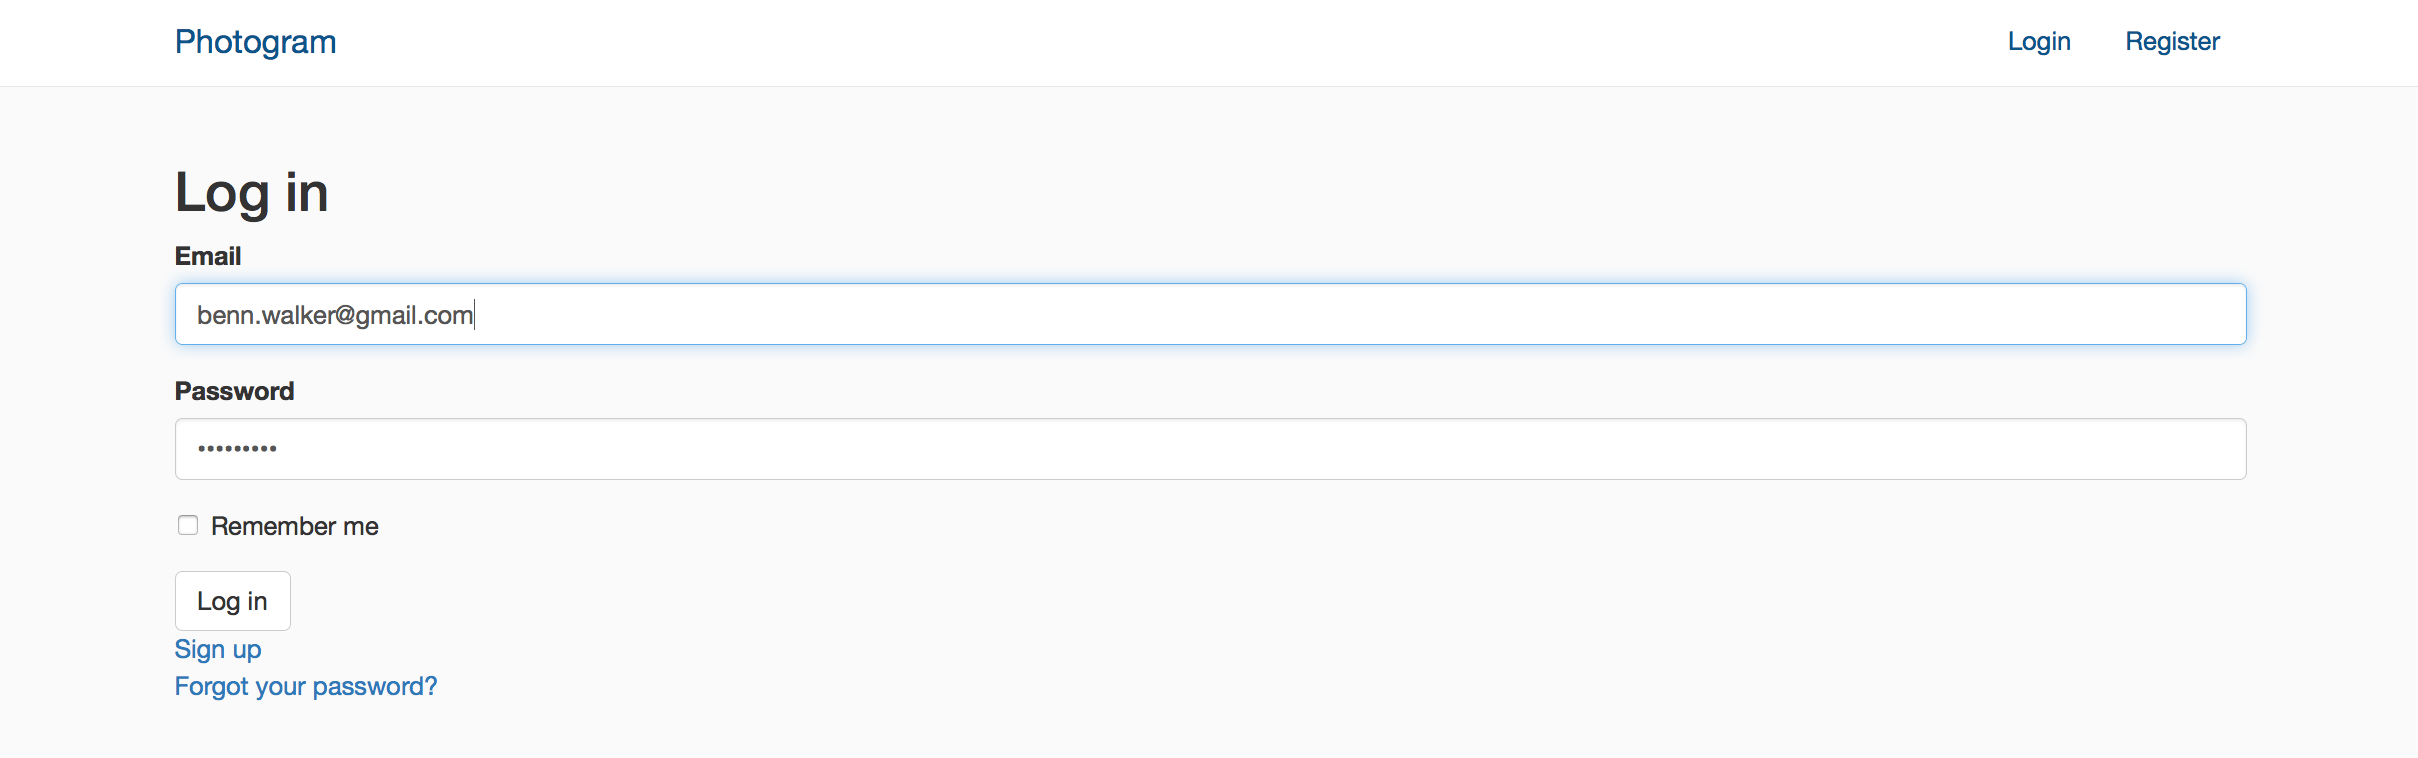
Disgusting, right? If your stomach can handle it, check this out:
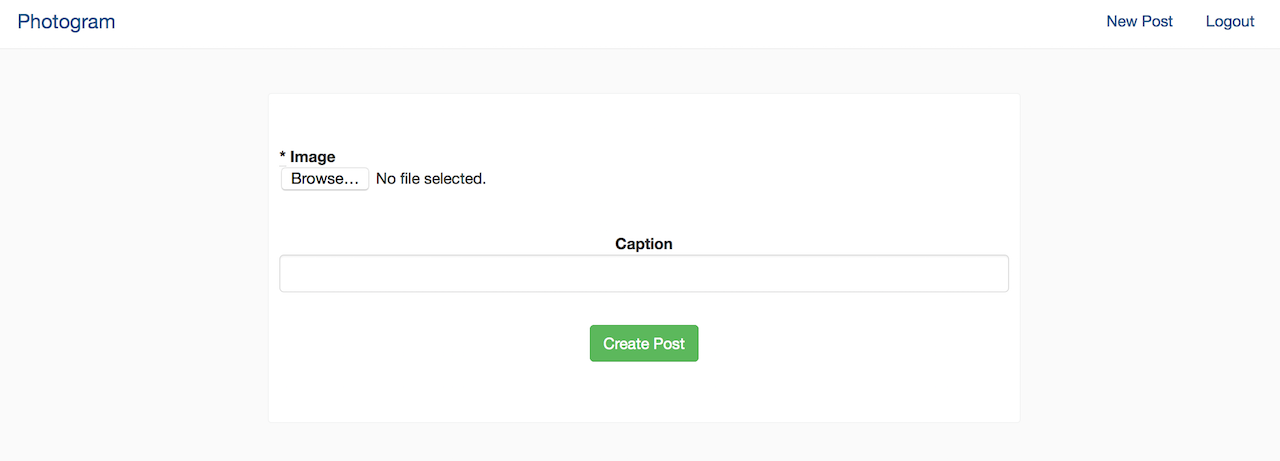
What the hell is that image upload button doing over there? Why is it so… unattractive?
Nobody knows, I’m afraid, but fear not. I’m here to save your eyeballs from further monstrosities. This is what we’re going to create:
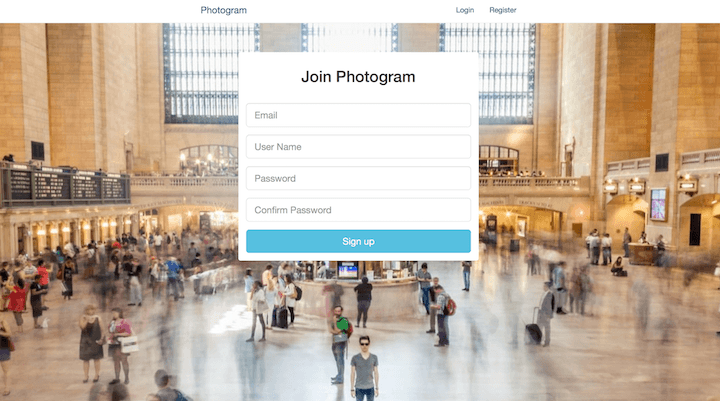
Ooh! I’d want to join that!
Oh my! I’d like to login to that site.
Noise of fainting
How great do those forms look now? It’s ok, you don’t have to tell me, they look fantastic. I know it and you know it.
Sign Me Up to This Glorious Looking Site
Let’s first attack our registration form, it is the form our users will see first after all. To begin, let’s make some simple styling choices and implement them with our bootstrap divs and some simple CSS.
This is what we begin with:
%h2 Sign up
= simple_form_for(resource, as: resource_name, url: registration_path(resource_name)) do |f|
  = f.error_notification
  .form-inputs
    = f.input :email, required: true, autofocus: true
    = f.input :user_name, required: true
    = f.input :password, required: true, hint: ("#{@minimum_password_length} characters minimum" if @minimum_password_length)
    = f.input :password_confirmation, required: true
  .form-actions
    = f.button :submit, "Sign up"
= render "devise/shared/links"
Just a simple HAML’d version of the standard Devise register view. The below image is what we want this form to look like:
Using the boostrap documentation for forms and the screenshot above, try to implement the new styling yourself. If you need some extra tips, think of it like this. You’re going to need to add the background image somehow, and you’re going to need to create the area for the form. I may have used Bootstrap’s inbuilt panels for basic layout too…
Oh yeah, don’t forget that the view for our registration form can be found at app/views/devise/registrations/new.html.haml.

Did you have a win? Of course you did! I’ll just show you my new form so we can compare notes.
Here’s my new view:
.registration-bg
  .container
    .row
      .col-md-4.col-md-offset-4
        .log-in.panel
          .panel-heading
            %h2 Create Your Account
          = simple_form_for(resource, as: resource_name, url: registration_path(resource_name)) do |f|
            = f.error_notification
            .panel-body
              = f.input :email, required: true, autofocus: true, label: false, placeholder: 'Email', input_html: { class: 'input-lg' }
              = f.input :user_name, required: true, label: false, placeholder: 'User Name', input_html: { class: 'input-lg' }
              = f.input :password, required: true, label: false, placeholder: 'Password', input_html: { class: 'input-lg' }
              = f.input :password_confirmation, required: true, label: false, placeholder: 'Confirm Password', input_html: { class: 'input-lg' }
              = f.button :submit, "Sign up", class: 'btn-lg btn-info btn-block'
And my new scss in my application.css.scss file.
html {
  height: 100%;
}

.registration-bg {
  padding-top: 4em;
  height: 100%;
  background-image: image-url('regbackg.jpg');
  -moz-background-size: cover;
  -webkit-background-size: cover;
  -o-background-size: cover;
  background-size: cover;
}

.log-in{
  margin-left: auto;
  margin-right: auto;
  text-align:center;
  border: none;
}

.panel {
  border-radius: 8px;
}

.panel-heading{
  h1 {
    text-align: center;
  }
}
Want a beautiful background image for yourself? Checkout unsplash and take your pick of pics.
Do you notice anything strange with your application now that we’ve implemented the above styling? You’re getting some ugly margins pushing away the background image, right? We’ve got to counter a couple of Bootstrap defaults here. In your application.scss file, add the following lines:
.navbar {
  margin-bottom: 0px;
}

.alert {
  margin-bottom: 0px;
}
Nice and simple. If you notice anything else that conflicts, remember to play around with the dev tools on your browser. It’s the easiest way to see what fiendish css rule is foiling your beautiful layout.
Also take notice of the included line of code in our form (it was in the old version too), the line that says:
= f.error_notification
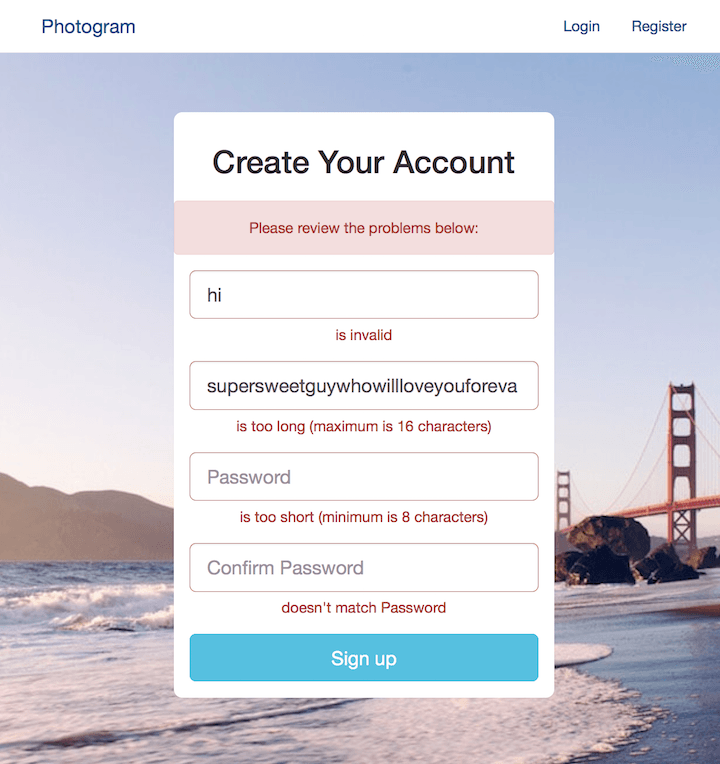
Open the registration form now in your browser and submit some crappy information that will fail the validations. Simple form handles the errors brilliantly. Not only does it tell us that we’ve messed up our form somehow, it guides us through exactly what went wrong. Good stuff.
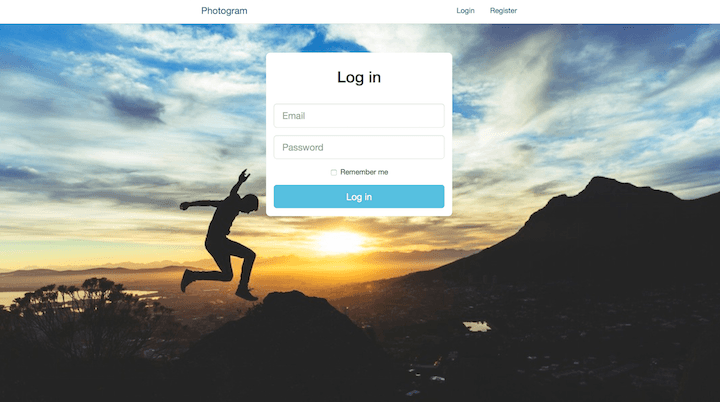
Logging in should feel like a win
You’ve already built one beautiful form, go ahead and try to build this one now. Use the exact same principles and heck, the same divs and css. let’s not be wasteful here. Here’s the new and improved login form again for reference:
Looks similar to the registration form, right? Well it is. Go forth and create it. You can find it at app/views/devise/sessions/new.html.haml.
All done? Oh yours is better than mine? Oh god you’re right…
Well here’s mine anyway:
The new haml view over at app/views/devise/sessions/new.html.haml`:
.login-bg
  .container
    .row
      .col-md-4.col-md-offset-4
        .log-in.panel
          .panel-heading
            %h2 Log in
          = simple_form_for(resource, as: resource_name, url: session_path(resource_name)) do |f|
            = f.error_notification
            .panel-body
              = f.input :email, required: true, autofocus: true, label: false, placeholder: 'Email', input_html: { class: 'input-lg' }
              = f.input :password, required: true, label: false, placeholder: 'Password', input_html: { class: 'input-lg' }
              = f.input :remember_me, as: :boolean if devise_mapping.rememberable?
              = f.button :submit, "Log in", class: 'btn-lg btn-info btn-block'
And, the associated scss:
.login-bg {
  padding-top: 4em;
  height: 100%;
  background-image: image-url('loginbg.jpg');
  -moz-background-size: cover;
  -webkit-background-size: cover;
  -o-background-size: cover;
  background-size: cover;
}
The rest of the styling is shared with the scss above ;)
Look good? You bet your ass it does. Now, onto…
Pretty Post Posting & Previews
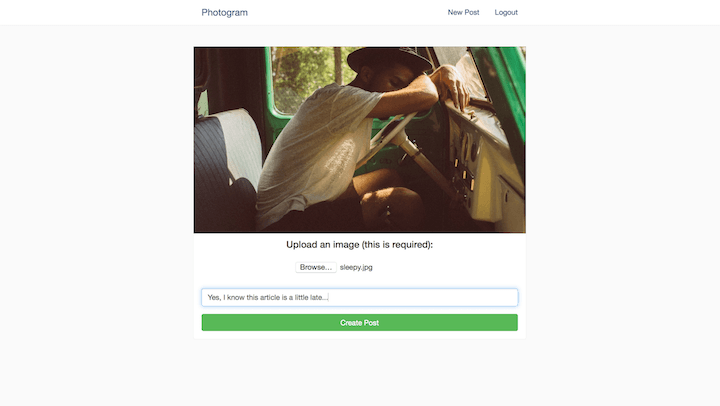
Our old form looks a bit yuck and we don’t get to preview our images either! It’s just not right. let’s shake things up a bit so our form actually looks OK, and we can have a quick glimpse at our image before we post, just in case we were to accidentally upoad a picture of our glutes again…
This is what the new form looks like again, for reference:

The image part of the form is automagically changed when the attached image is changed in the form. We have a default image in it’s place before we’ve chosen something to upload. The rest of the form is pretty similar to what it once was, we’ve just spiced things up a little.
Give it a go now, try to make it look better than mine! Feel free to give fancy uploaders like Dropzone or jQuery Upload a go too for the sake of a challenge (maybe just create a git branch first.)
Good luck you crazy thing.
Alright, we’ve got a few bits to this puzzle but it’s much simpler than using Dropzone / jQuery. First, here’s our new view file, found at app/views/posts/_form.html.haml:
.posts-wrapper
  .post
    .post-body
      .image-wrap
        = image_tag 'placeholder.jpg', id: 'image-preview', class: 'img-responsive'
        = simple_form_for @post, html: { multipart: true } do |f|
          .row
            .col-md-12.text-center
              = f.error_notification
          .container-fluid
            .form-group.text-center
              %h4 Upload an image (this is required):
              = f.input :image, label: false, input_html: { onChange: 'loadFile(event)' }
            .form-group.text-center
              = f.input :caption, label: false, placeholder: 'Add your caption'
            .form-group.text-center
              = f.button :submit, class: 'btn-success btn-block'
Alright, so let’s discuss the three differences from the old form, to the new.
- We’ve got a simple image_tag image as a placeholder with a specific id.
- We’ve got a suspicious looking html addition to our image input, called
onChange: 'loadFile(event)' - We’ve added some extra divs for styling purposes.
Let’s look at the javascript that has caused us to make these changes. Here’s some fresh javascript that now lives within my app/assets/javascripts/posts.js file (I had to rename it from .coffee):
var loadFile = function(event) {
  var output = document.getElementById('image-preview');
  output.src = URL.createObjectURL(event.target.files[0]);
};
That’s all! How good is that? On change, we grab the ‘image-preview’ element, and change it’s src attribute to the file path of our input (if it is in fact, an image file).
I really love this, because of it’s sheer simplicity. It achieves what we want, an image preview and therefore better form, and does so with three (and a bit) lines of javascript.
Here’s some extra styling you can add to your application.scss file too:
#image-preview {
  margin: 0px auto;
}

#post_image {
  padding: 1em;
  margin: 0px auto;
}
So let’s say you ran with my idea regarding the new posts form, do me a favour now and edit one of your existing posts. Change the image and see what happens…
Yep, we’re duplicating the image preview in the edit view and it’s not being friendly with our new javascript preview feature. Let’s fix that now.
Editing editing
So we’re duplicating the display of our images… Wouldn’t it be great if the default image was in fact the image for the post we’re looking at, when available?
Do your best to fix this issue now. I’ll give you a hint, I used a helper to move the logic out of my view. The helper method uses a simple if / else statement to determine whether the post at hand has an existing image or not. If it does, display that image, otherwise, display the placeholder image.
It’s your turn to take the reigns.
Ok, here’s how I implemented the fix. First, I deleted the image_tag from the edit.html.haml view that was handling our original preview functionality. The edit.html.haml file now looks like:
= render 'form'
.text-center.edit-links
  = link_to "Delete Post", post_path(@post), method: :delete, data: { confirm: "Are you sure you want to delete this post?" }
  |
  = link_to "cancel", posts_path
Moving onto the _form.html.haml partial, I removed the image_tag and instead am calling my new helper:
.posts-wrapper
  .post
    .post-body
      .image-wrap
        = form_image_select(@post)
        = simple_form_for @post, html: { multipart: true } do |f|
          .row
            .col-md-12.text-center
              = f.error_notification
          .container-fluid
            .form-group.text-center
              %h4 Upload an image:
              = f.input :image, label: false, input_html: { onChange: 'loadFile(event)' }
            .form-group.text-center
              = f.input :caption, label: false, placeholder: 'Add your caption'
            .form-group.text-center
              = f.button :submit, class: 'btn-success btn-block'
The helper is simply called form_image_select and I’ve created it within the app/helpers/application_helper.rb file, below our bootstrap flash helper. My new helper looks like:
def form_image_select(post)
  return image_tag post.image.url(:medium),
                   id: 'image-preview',
                   class: 'img-responsive' if post.image.exists?
  image_tag 'placeholder.jpg', id: 'image-preview', class: 'img-responsive'
end
Hopefully that makes sense. In our form partial, we call the form_image_select helper which simply determines if the @post we’re referring to has an image or not. If it does, we display that image, along with the associated id and class. If not, we display placeholder.jpg which is safely stored in app/assets/images/. Feel free to make your own for the sake of the exercise. Resize to 640 px wide for best results.
Success!
Congratulations. You now have great looking forms for the marjority of your application! Combine that with a image preview for your new and edited posts, you’re truly winning. Not only will this save you the embarrassment of revealing your junk to your siblings, it also provdes for a great user experience.
There’s something else I’d like to attack in this article, and it also has to do with user experience. User experience and preventing our server from imploding…
Paginate all of the things
Yes. We’re going to paginate everything you can dream of. Luckily for me, you have a poor imagination, which means we’re going to paginate our posts on the index and our comments for each post.
Why paginate? Well consider our application for the moment. Every.single.post and every.single.comment is being called on our index. In our posts controller, our @posts instance variable is set to Post.all after all.
It’s giving us litererally everything.
And that’s ok… until it isn’t. It’s ok on my development server because I have half a dozen posts. It’s not ok in production when we have many, many more posts. The same is true for our comments. Looking at our _post.html.haml partial, we can see that we’re simply iterating through every single comment that exists on a post and displaying them all.
It’s not ok, so let’s fix it now.
Pleasantly Paginating Posts
We’ll paginate comments soon, I assure you. First, let’s paginate our posts.
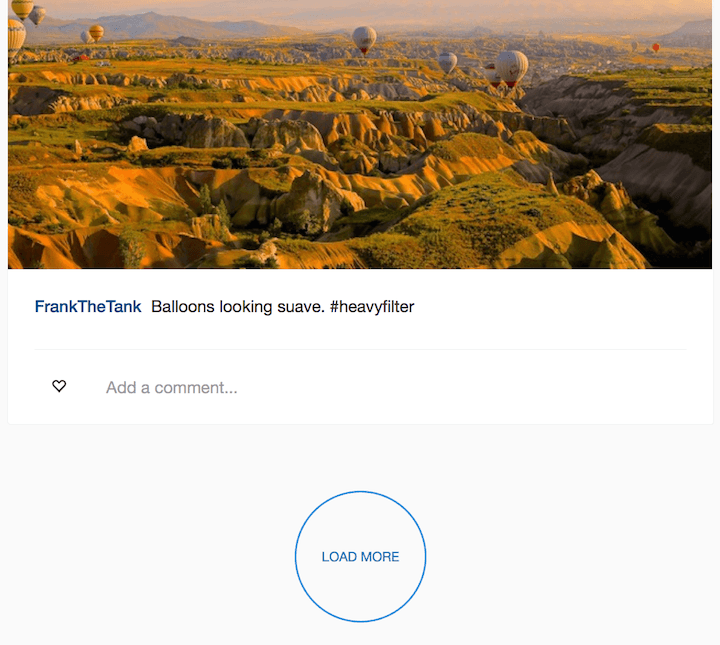
Instagram handles this on the desktop version of their site with a big round ‘LOAD MORE’ link (when it doesn’t use ‘infinite scrolling’), so let’s just do that too. Instagram also loads 12 posts at a time which seems pretty sensible. Want to go completely mad?
Load 13 at a time.
You’re on your own though, I dare not push my sanity that far. let’s incorporate this feature now by installing a lovely gem called, kaminari.
Before you get too excited, read through the docs first. I don’t expect you to understand everything, I just want you to have a good high level overview of what it does.
Once informed, add the gem to your Gemfile as:
gem 'kaminari', '~> 0.16.3'
and run bundle install in your terminal. Once that’s done, run the kaminari config generator in your terminal with:
rails g kaminari:config
The only option we’re going to change here is setting the default_per_page option to 12. We’re now done setting up! Oh, for what it’s worth, if you want to lower the default_per_page option to make it easier to see pagination in action within your running server, go for it. You can always go back and change it easily enough. I personally dropped it to 3 while writing this very article!
Open your posts_controller.rb file now and adjust your @posts instance variable within your index action. We want to paginate it as per our default setting:
def index
  @posts = Post.all.order('created_at DESC').page params[:page]
end
And that’s it! Restart your server within your terminal and then re-visit your index to see the changes. You’ll only see the number of posts specified in your config. Want to see the rest? Well we can manually move to a specific ‘page’ by adding the page param to your path. Try http://localhost:3000/?page=2 and you should be able to see the next round of posts! If you have enough posts, you’ll be able to go onto page 3 and 4 and so on.
This is all well and good but we don’t want our users to manually input parameters into the address bar because we’re not complete psychos. It’s incredibly simple to add page number links to your index view. In fact, it’s only just hit me how I’ve been completely holding your hand through this whole process! Do me a favour now, and refer back to the kaminari docs and look for the sections that refers to views. It’ll show you how to add the links.
So you clicked that link and did it yourself right? Of course, of course, I’m sorry I questioned your honesty.
Jump into you index.html.haml view and adjust the file so it looks like this:
-@posts.each do |post|
  = render 'post', post: post

= paginate @posts
Could it be any easier? Probably not. How good is kaminari?
If you jump back into your index again, you should be able to click around on the page numbers and be taken to each. Whilst it’s fantastic that we’ve implemented pagination and our server is no longer imploding, the user experience still isn’t what I expect from a modern day web application. I feel like it should be… nicer.
Where art thou AJAX?
We’ve rumbled in the AJAX jungle back in Part 2 of this guide, when we created and deleted new comments for posts via AJAX calls and used some jQuery magic to adjust the DOM appropriately. Let’s do something similar now so that we don’t need a full page refresh when we request more posts.
Give it a go yourself first though. Just a simple google search for ‘kaminari ajax’ will give you plenty of guides and stackoverflow questions to look at. We want our functionality to work like so:
- Click on a LOAD MORE button at the bottom of the page and then append the next ‘page’ of posts below an id or class used to contain the existing posts.
Go forth and create! If you want bonus points, maybe consider an ‘infinite scroll’ feature where the extra content will be loaded simply by scrolling down. Instagram seems to do it both ways, and there are guides for both, so let your heart guide you.
Here’s how I implemented this feature, manual clicking style. First, I slightly adjusted the index view and added a new partial (for the sake of AJAX). Here’s my updated index.html.haml:
#posts
  = render 'posts'

#paginator.text-center
  = link_to_next_page @posts, 'LOAD MORE', remote: true, id: 'load_more'
Differnces? We’ll I’ve got a new div with the ‘posts’ id. Also, instead of iterating through each post at this point, I’m rendering a new partial called ‘posts’. Lastly, I’ve added remote: true and an id to the link_to_next_page paginator, as well as a div above that with the id ‘paginator’. The added divs are all for the sake of either jQuery or styling our new button.
Speaking of styling, below is the the additional lines in my application.scss file. Just add them to the bottom of your existing code.
#paginator {
  color: #4090DB;
  height: 120px;
  width: 120px;
  margin: 60px auto 40px;
  position: relative;
  display: table;
  border: 2px solid #4090DB;
  border-radius: 50%;
  :hover {
    border: 1px solid #2D6DA8;
    border-radius: 50%;
  }
}

#load_more {
  display: table-cell;
  font-size: 12px;
  padding: 0px 9px;
  vertical-align: middle;
  text-decoration: none;
  a :hover {
    color: #2D6DA8;
  }
}
Our index is now rendering a views/posts/_posts.html.haml partial, which should look like this:
-@posts.each do |post|
  = render 'post', post: post
It’s simply the block that iterates through each post in the @posts collection, rendering the _post.html.haml partial for each itme. Why do this? Well, it’s for the sake of our AJAX & jQuery magic, something that I’ll run through in a moment.
Finally, I’d like to show you a new file called index.js.erb.
This file is very similar in nature to the create.js.erb and destroy.js.erb files that we created for the sake of our comments in the last article. It contains jQuery for the sake of manipulating the DOM once the ‘LOAD MORE’ link is clicked and we’ve been given some data to use in our view.
The following will live in app/views/posts/index.js.erb.
$('#posts').append("<%= escape_javascript(render 'posts')%>");
$('#paginator').html("<%= escape_javascript(link_to_next_page(@posts, 'LOAD MORE', remote: true, id: 'load_more'))%>");
if (!$('#load_more').length) { $('#paginator').remove(); }
What’s happening here? In the first line, we append the #posts div with the new _posts.html.haml partial, ie. we add it on the bottom.
In the second line, we select the #paginator div and set it’s contents to our link_to_next_page kaminari helper method. This will ‘refresh’ our link, meaning it will take us continually onto the next page as we keep clicking, rather than constantly giving us a link for page 2 and will also reset it’s position.
In the third line, we remove the #paginator div if the #load_more element (our link) doesn’t exist. This is purely to remediate some styling quirks that I was seeing once I’d run out of posts to paginate. Feel free to remove that line and experiment for yourself.
I’ll mention a little quirk I found in my application that you may not experience. At one point when implementing the above funcitonality, Rails was complaining that there was no user_name method for Nil when referring to comment.user.user_name in the _comments.html.haml partial. If you run into this error, add a conditional above that line, something like below:
.user-name
  - if comment.user
    = comment.user.user_name
.comment-content
This no longer occurred once I built out some more features I’ll talk about below, I’m just mentioning it here in case it helps you, dear developer.
Refresh your browser and be amazed wiht our new functionality. You scroll down, click the ‘LOAD MORE’ link (which looks kinda similar to Instagrams…) and you’re then presented with some brand new posts!
Great stuff.
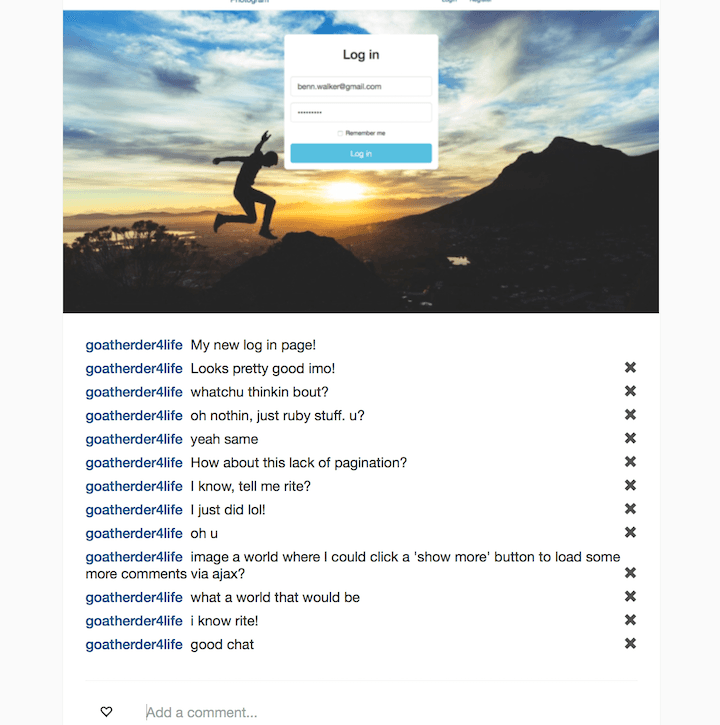
Paginating Comments. AJAX first, ask questions later.
We’ve seen how pagination works as standard with Kaminari, we get a ‘paginator’ that links to pages, which correspond to a particular sub-set of our data model. This won’t work for our comments, so let’s not go over that again. With the comments, let’s just jump straight in to some sexy AJAX action.
How does Instagram handle ‘showing more’ comments? Well, the maximum comments they’ll show below a post is four. If there’s more than that for the particular post, you’ll be given a link above the four comments that says ‘view all x comments’ where x is the total number of comments for the post.
At this point, Instagram are clearing trolling their users though, because clicking that button goes on to only reveal 20 more comments. If there are any more than that, you’ll get a new link that says ‘load more comments’. It’ll just sit there all smug as proof that ‘load all x comments’ was a complete lie.
Let’s build this feature now (but a little different). I’m not going to troll my users, but feel free to if you want. I’m simply going to add a link above the comments that says ‘view all x comments’ and then loads them all.
What I want you to do now is have a ponder about how you could implement this yourself. How will this differ from your posts pagination? Well first, the order will be a bit different… you might also have to get specific regarding the element id’s that jQuery will be playing with too… oh yeah, you might have to jump through some crazy hoops to get it working on the index…
Oh, I’m just thinking out loud in writing, go on, give it a go!
I want to quickly mention here, that this exact feature has had a lot to do with this article being so late. This drove me mad for a few days trying to work out the best way to implement it. I’m happy with what I ended up with, BUT if you can recreate exactly what Instagram does OR if you can implement a feature where you click ‘load more comments’ and it loads them incrementally in a more standard way, please, leave me a comment at the bottom of this article so I can add it on (with full credit of course, you pessimist.)
Before I give you my solution, I want to tell you the issues I faced when implementing the ‘show more comments’ feature. I moaned briefly about this above.
- The index. My god, what a pain. You can’t assign
@commentsin your controller of course because you’re not dealing with a singular@post. So how then, do you paginate your comments? If you call a standardremote: trueAJAX event on a link or button, you’re still going to have troubles accessing the specific post’s comments. - You can’t paginate the comments easily on the index (did I mention this?). You can try to add
= paginate post.comments.page params[:page]for each posts comments but try to add the paginator for that collection and you’re going to have a bad time. - Want to paginate comments on the show action of an individual post? No problemo, but that index…
So how did I achieve my result?
It turns out that the remote AJAX calls can return many things, javascript, JSON and even a whole bunch of html. So what I did is to write some javascript that would listen for a click on a more-comments class and return html in the form of a _comments.html.haml partial that iterates through each of a post’s comments and renders them via a _comment.html.haml partial.
It’s not as complex as it may sound and I assure you it’ll make more sense after looking at the code. First, here’s my adjusted portion of the _post.html.haml partial:
.comments{id: "comments_#{post.id}"}
  - if post.comments.any?
    .paginator{id: "#comments-paginator-#{post.id}"}
      - unless post.comments.count <= 4
        = link_to "view all #{post.comments.count} comments", post_comments_path(post), remote: true, class: 'more-comments', data: {post_id: "#{post.id}", type: "html"}
    = render post.comments.last(4), post: post
A bit gross, right? Yeah, it should be tidied up and thrown into a helper method but let’s just deal with this for the moment. I want you to notice a few things:
- We’re adding
#{post.id}inline ruby in multiple positions in order to identify the specific post we’re referring to in our jQuery. We’re also giving ourlink_tohelper method a html 5 data attribute ofdata-post-idthat is set to the id of the post for the sake of our jQuery too. - Next, notice that we’re rendering
post.comments.last(4)on the last line, we’re not even using kaminari’s pagination in this solution. - Above the
link_tomethod, we’ve got an ‘if’ statement that will only reveal the ‘view all posts’ link if there are greater than 4 comments for that specific post, otherwise the link would be redundant. - Inside the
link_tohelper method, we’ve got theremote: trueattribute, but we’re also specifying that we want html to be returned in the data attributes hash.
Good? Good. It’s worth noting what our link_to helper method is actually linking to also. We’re linking to post_comments_path(post) which say, for the post with an id of 23, would be /posts/23/comments. This will be calling the index of the comments controller.
Ok, so we’ve got our link set up and we have some dynamically generated post.id’s around the place so we can manipulate the correct items. Let’s now see what we’re doing in our javascript. I’ve stored this file in the standard javascripts folder, app/assets/javascripts and called it, loadMoreComments.js.
This is for Rails 4:
$( document ).ready(function() {
  $('.more-comments').click( function() {
    $(this).on('ajax:success', function(event, data, status, xhr) {
      var postId = $(this).data("post-id");
      $("#comments_" + postId).html(data);
      $("#comments-paginator-" + postId).html("<a id='more-comments' data-post-id=" + postId + "data-type='html' data-remote='true' href='/posts/" + postId + "/comments>show more comments</a>");
    });
  });
});
Are you using Rails 5? Use this code instead:
$( document ).ready(function() {
  $('.more-comments').click( function() {
    $(this).on('ajax:success', function(event) {
      var postId = $(this).data("post-id");
      $("#comments_" + postId).html(event.detail[2].responseText);
      $("#comments-paginator-" + postId).html("<a id='more-comments' data-post-id=" + postId + "data-type='html' data-remote='true' href='/posts/" + postId + "/comments>show more comments</a>");
    });
  });
});
Remember, if you have any issues, please leave me a comment below this article and I’ll help out!
I’m going to humour you and run through this line by line. If you don’t need me to, just skip the dot points below and bask in your smugness.
- Wait for the document to be ready before running the code.
- Listen for a click event on the
.more-commentsclasses (each of our ‘view all x comments’ links). - Once the AJAX call has been successful, move on to the next lines.
- Assign a
postIdvariable based on the contents of thedata-post-idhtml attribute (which we assigned in our post partial above). - Replace the
#comments_ + postIddiv with the contents of the returned AJAX data.
Remember, we’re returning html in our AJAX call. Based on our link_to method, we’re sending a GET request to the comments of a specific post id. What else does this mean? We’re going to need to create an index action within our comments controller in order to present some html to send over.
Open up the comments controller found at app/controllers/comments_controller.rb and add the following code above your create and destroy actions.
  def index
    @comments = @post.comments.order("created_at ASC")

    respond_to do |format|
      format.html { render layout: !request.xhr? }
    end
  end
So we’re returning all of the comments for a post in an ascending order. We’re responding to html (as is the default) but we’re also adding a little bonus. We’re requesting that the application’s layout view is only rendered as part of this request, if the request isn’t made with AJAX. Simply put, we won’t get the added layout html returned during an AJAX call, which is great news, we only want the extra comments from this index after all, not an extra navbar!
What else do we need? How about a view for our new controller action? We need to tell Rails what html we want rendered after all. Here’s my new index.html.haml file found under the app/views/comments folder.
= render @comments, post: @post
Well that was brief! What are we doing here? We’re rendering each of our@comments via our existing _comment.html.haml partial that lives in the views/comments folder. We’re passing it the @post instance variable from our index action for the sake of the attached delete feature.
Quite simple, we simply render the _comment.html.haml partial for each comment.
Now, here’s the last piece of the puzzle, our unchanged views/comments/_comment.html.haml partial.
#comment
  .user-name
    = comment.user.user_name
  .comment-content
    = comment.content
  - if comment.user == current_user
    = link_to post_comment_path(post, comment), method: :delete, data: { confirm: "Are you sure?" }, remote: true do
      %span(class="glyphicon glyphicon-remove delete-comment")
This should be familiar as it remains unchanged from what we built in Part 2 of the guide.
Now that it seems like it’s all working and I even used the term ‘last piece of the puzzle’… it’s still not quite right.
There’s another last peice to the puzzle and I LIED!
If you’ve been following along up until now, I want you to do something. Click some ‘view x more comments’ on a few of your index posts and ensure that it works. Now, click on an individual post and attempt it there.
NOPE!
Why?
Turbolinks. It can conflict with jQuery when waiting for $(document).ready. Luckily for us, it’s an easy fix. Add gem 'jquery-turbolinks' to your gemfile and the line //= require jquery.turbolinks to your application.js file.
Retry the experiment above and you’ll have a win. Finally…
It won’t look great at the moment, so if you want to add some pizazz, add the following scss to your app/assets/stylesheets/application.scss file:
.comments {
  .paginator {
    margin: 0.5em;
    .more-comments {
      color: #A5A7AA;
    }
  }
}
The above process seems complex for what seemed initially to be a simple feature but it really isn’t so complex. The flow is simply this:
Click a link with remote: true that expects html to be returned -> Use jQuery to pick up on that click and add the retrieved data to a specific point on the page
We just needed to add our extra partial and some dyanamic id’s and data-attributes to make this simple flow work correctly!
The End, for now
Let’s run through what we achieved in Part 3 of the let’s Build Instagram Guide.
- We beautified our forms so that users will actually want to join our glorious, completely original social network.
- We’ve got a great little image preview feature on our post uploads.
- We’re only loading a specific number of posts per page now in order to stop our server from melting down. We append the next page of posts without refreshing the page.
- We now only list 4 comments for each post by default. Want more? Click the button and you’ll see a full list without a page refresh.
Pretty good! I’m sorry that it took me a little longer than expected to produce, but alas sometimes we developers bash our heads against a wall for an extended period before anything useful comes out.
Next time, let’s build ‘likes’ for posts and user profiles!
Do you want to be notified when Part 4 of the guide or any future articles or builds are released? Get a pen our and write your email address on your monitor in the general region of that box below. Trust me, I know how the internet works.