Let's Build Instagram With Rails, Part 4: Presenting Pretty Profiles
22 October 2015
Today we’re building profile pages for all of our users!

But first…
Previously, on Let’s Build Instagram:
Part One - CRUD actions for our posts, each with an image and caption.
Part Two - User functionality with registration and sign-in forms. Also, Adding comments to posts via AJAX.
Part Three - We paginate our posts and comments and also create beautiful registration and login forms
Bonus Guides - The associated testing handbooks for Part One - CRUD & Part Two - Users & Comments.
Github link to the code for this article
I missed you, it’s true
And I’m sorry it’s taken so long for me to return! I’ve been working on a really exciting piece of software using something other than Rails so it’s been quite a learning experience for me and I sincerely appreciate your patience.
Now that I’m back, I also want to let you know that I’ve now got some limited availability to take on new clients from mid-November. You’ll need to have a minimum budget of $6000 (this will cover a startup MVP style project, my portfolio will explain more shortly) and be prepared to have your socks blown off with a beautiful piece of software for your business and customers.
Whether it’s a startup idea or you have an existing business and have a great idea for software, let’s build it together. I can guarantee you’ll fall in love with both what we create and with the build process itself. Send me an email at [email protected] to chat further.
Oh yeah, about that other project of mine. I built it using Meteor.js and it was pretty nice to use! Meteor is a full-stack, real-time javascript framework that makes it super simple to build fully fledged web apps quite quickly.
Is it better than Rails?
Nope, it’s a different tool for a different job.
Apps are completely real-time by default with Meteor and you’re dealing with MongoDB primarily as your database so there’s definitely a specific use-case for it. Javascript isn’t as nice to write as Ruby but MongoDB is super simple to get used to and the community is great, just like the Ruby / Rails community.
If you’re looking to challenge yourself, extend your skill-set and have a use-case for MongoDB & real-time functionality, I’d highly recommend it.
Enough about that though, let’s talk about what we’re going to build in this instalment of Let’s Build: Instagram with Rails.
Unsatisfied with a single stream of posts that mixes everyone together, we’re going to create profile pages for our users! We’ll let our users choose a photo for their profile picture and let them create a brilliant bio to sum up their existence at the top of their profile. We’ll be able to check out our user’s profile pages by clicking on their names and we’ll be presented with a stream of their posts and only their posts. I also want to make sure the url looks nice by ensuring we’re using the user name, rather than the id of the user (yuck).
I won’t be writing a seperate test-driven version of this guide BUT, I will give you some tests to implement before each feature if you’d like to test-drive your way to success (as you should!).
Let’s begin…. meow.
Testing our way to success (read the first part even if you don’t intend on testing).
Let’s think about what a profile page is, in order to flesh out the features and think about how to write our tests (if you so desire). We have:
- A user name in the URL.
- A profile picture that the user can change if they’d like (we’ll have a default image). If you’re on your own page, you’ll be able to click the image and change it.
- An editable bio for each user (which is empty by default). If you’re on your own page, you’ll be able to click an ‘edit profile’ button that will let you change your bio.
- The url for editing your profile details should be ‘/:user_name/edit’
- A stream of only the appropriate user’s posts shown below the profile picture and bio. We’ll stick to the vertical stream in this guide but you could always implement something like masonry.js if you’d like something similar to the grid-view that Instagram uses by default.
Let’s start by thinking about our tests ( skip this part if you hate knowing your code works ).
Here’s how our feature tests will look if we could write them in pure English:
Viewing user profiles.
feature 'viewing user profiles' do
  background do
    # Create a user.
    # Create a second user
    # Create a post owned by the user.
    # Create a post owned by the second user.
    # Sign in with the first user.
    # Visit the dashboard.
    # Click the first user's user name
  end

  scenario 'visiting a profile page shows the user name in the url' do
    # Expect the page's URL to be '/users/user-name'.
  end

  scenario "a profile page only shows the specified user's posts" do
    # expect the page to show the user-owned post.
    # expect the page to not show the other user's post.
  end
end
A user can edit their profile:
feature 'editing user profiles' do
  background do
    # Create a user.
    # Create a second user
    # Create a post owned by the user.
    # Create a post owned by the second user.
    # Sign in with the first user.
    # Visit the dashboard.
  end

  scenario 'a user can change their own profile details' do
    # Click the first user's user name
    # Click the 'Edit Profile' button.
    # Click the 'Choose new profile image' button.
    # Select the new image.
    # Fill in the bio field with 'Is this real life?'
    # Click the 'Update Profile' button.

    # Expect to be routed to the profile page.
    # Expect to see the updated profile image.
    # Expect to see the updated profile bio.
  end

  scenario 'a user cannot change someone elses profile picture' do
    # Click the first user's user name

    # Expect to not see the 'edit profile' button.
  end

  scenario "a user cannot navigate directly to edit a users profile" do
    # Directly visit another user’s edit url.

    # Expect to not see ’Change your profile image:'
    # Expect the path to be the root path.
    # Expect to see the message, "That profile doesn’t belong to you!"
  end
There’s your guide for the tests. If you want to test-drive this project, convert the above into your specs and start building! Go!

Need some help converting the tests? Check mine out here for viewing profiles and here for editing profiles.
Presenting Pretty Profiles
Let’s start our build by building out our user profiles.
First, let’s make sure our usernames are ‘clickable’ links, rather than just the placeholders they’ve been thus far. This will let our users actually visit the profile pages in a simple way (just as Instagram has handled it!).
Track down your app/views/posts/_post.html.haml partial view and let’s add a link_to helper to the user name at the top of the post. Replace the existing code:
.user-name
  = post.user.user_name
With this:
.user-name
  = link_to post.user.user_name, profile_path(post.user.user_name)
Please note that we don’t have a profile_path route defined yet, so if you navigate over to your dashboard, you’ll see a big fat error. Which is good, we can fix that!
Now, we’re going to be creating a specific route for this path and not using Rails ‘resourceful routing’.
Why?
Well first, I don’t want the users profile to look like this: photogram.com/users/benwalker. I want it to simply be photogram.com/benwalker. I also want the route to use the user-name rather than the user’s ID. This is possible with the standard route, but let’s remove the users namespace altogether.
Go on, give it a go yourself. You can read about routing in Rails here.
Let’s first create our new route. In your routes.rb file, add the following line:
get ':user_name', to: 'profiles#show', as: :profile
Want to read what’s going on here?
- We’re going to GET (rather than POST or PATCH etc) our user name path. Why are we using a symbol? Well, that let’s us use a dynamic parameter for the sake of our route. If we just wrote
get 'user_name', our route would be fixed as ‘photogram.com/user_name’. BUT with our current setup, we can pass user names as the param and get all dynamic and snazzy. - We’re going to get the details for what to do with this route from the ‘profiles’ controller and the ‘show’ action. We don’t have a profiles controller yet, so we’ll have to take care of that.
- The
as: :profileline let’s us use handy Rails routing helpers in our code. This will let us user theprofile_pathhelper (just as we’ve usedpost_pathorposts_pathpreviously).
Beautiful! Now if you were to reload your page, you should be error-free and you should also be able to hover over a post’s user name and be greeted with a beautiful link to their profile, just where we wanted.
If you were crazy enough to click on said link, you’ll be greeted with yet another error. That will teach you for being too bold and that you should only do things exactly how and when I’m saying (I’m joking please don’t ever do that. Click on all of the things).
You should be ok to generate your own controller. Remember, we want it to be called ‘profiles’ and we want a single ‘show’ action for the moment.
Let’s generate our new controller to control our profile. Jump on into your terminal of choice and tap away these words:
rails g controller profiles show
After a blur of progress, you’ll be greeted with a few extra files in your text editor! Hurrah!
Now if you were to jump back to Photogram and click on a user’s user name on a post, you’ll actually be linked to the appropriate route which is 100% badass. Now it’s time to make that route actually do something useful.
First, we’ll need our ‘show’ action to actually point us to some useful data. Remember, we want to only show the specific user’s posts. We also want it to show a bio and profile picture, but let’s start with the posts.
Give it a go yourself. Remember, we have a param in our url that will be quite useful when trying to find the appropriate user. We might even be able to use associations to keep the code nice and clean!
Alright, let’s find the right posts for each profile’s specific user. We have a user name to work with in our url, so let’s track down our user. Under the ‘show’ action, tap away until this appears:
def show
  @posts = User.find_by(user_name: params[:user_name])
end
How good is that? But wait, that’s only going to get us a user object, how do we get their posts?
Easy Peasy!
We just add a .posts method to the end. The code will look like:
def show
  @posts = User.find_by(user_name: params[:user_name]).posts.order('created_at DESC')
end
Beautiful. Notice that I’ve ordered the posts too, just for good measure.
Now that we have an instance variable to work with, let’s get the view built to use that data.
First, rename the app/views/profiles/show.html.erb to show.html.haml (if you value your sanity and use haml) and then just copy and paste your existing code from the index view of your posts controller. That should look something like this:
-@posts.each do |post|
  = render 'posts/post', post: post
Good work. Click on a user name and you should be greeting with a list of their posts and their posts only.
Give yourself or a nearby human a high five to celebrate.
Expressing Egos with Elegant Essays
It’s bio and profile picture time! If you want a refresher on the features we’re building here, go back up to the test section and have a quick scan. If a profile page belongs to us, we want to be able to click an ‘Edit Profile’ link and there, have the ability to change our profile picture or our bio, save the info and be redirected back to our profile to be greeted with our new information.
Not only this, I want the profile route to NOT be ‘photogram.com/users/1/edit’.
NO!
It’s ugly and I don’t like it! I want to simply be ‘photogram.com/benwalks/edit’.
First, let’s create our link.
No wait, first YOU create the link. I’ll be waiting over here, behind my monitor, for you to finish.
Please hurry though, I’m tired and thirsty.
Thank the gods you’re finished, I’ve been waiting for at least a few micro-seconds for you to completely ignore the ‘Your Turn’ goat and just scroll on down to this paragraph.
Let’s get rolling with this linking business.
At the top of the app/views/profiles/show.html.haml file, before the posts block, add a link_to helper, if you’re the owner of the profile.
- if @user == current_user
  = link_to 'Edit Profile', edit_profile_path(@user.user_name)
Notice our new instance variable there? Let’s add that to our profiles controller now.
Above the @posts instance variable, add this line:
@user = User.find_by(user_name: params[:user_name])
Which will give us the user object for the current profile we’re looking at. Also note in the above link_to helper, that we’re using the user_name of the user, not their id. Remember that we’re using the user-name as the reference, not the id in this scenario.
We’re also going to need to add a route for our new edit profile path. In your routes.rb file, add this line somewhere sensible:
get ':user_name/edit', to: 'profiles#edit', as: :edit_profile
Let’s go over this again quickly for repetitions sake. We’re GETting a route, and using the edit action within the profiles controller to do something with it. We want to be able to refer to this particular route as edit_profile_route.
Nice!
If you were to refresh a profile page at this point and hover over our newly created link, you should see a nice looking path that you’d be routed to. If you were to click on said link, you’ll be greeted with errors.
We need a view Ben
Yes, yes of course. Let’s build one now. Instagram’s ‘Edit Profile’ page is a little complex for our needs at the moment AND it won’t let me update my profile picture via desktop, so let’s divert from what they’re doing for a moment and go completely wild.
This is what our ‘edit profile’ page is going to look like:
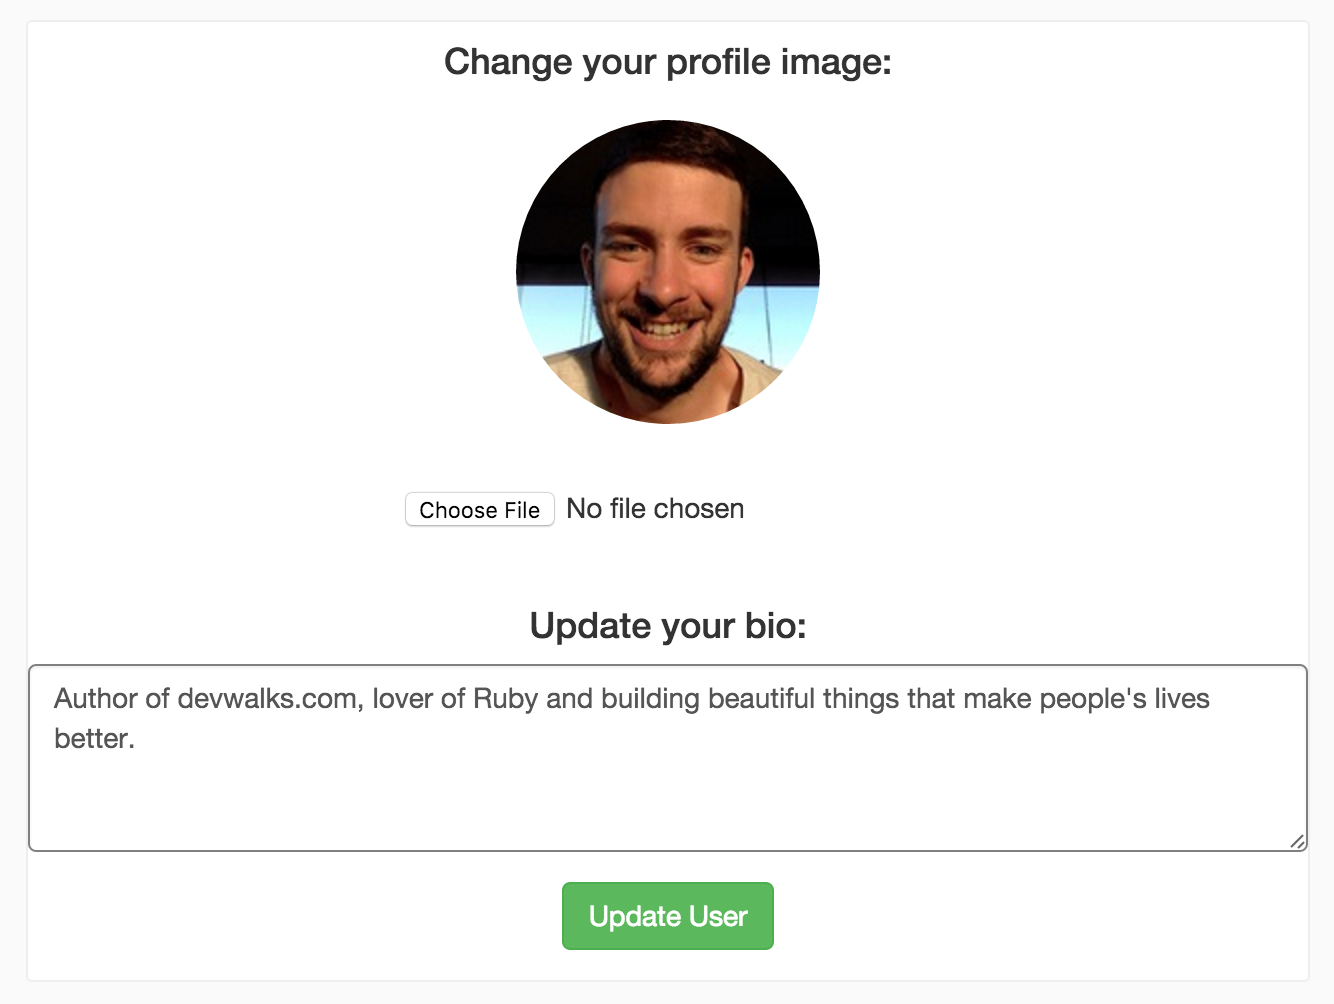
Looks pretty nice, right?? We’ve simply got a image upload field as our top row, as per our ‘New Post’ preview and a single ‘Bio’ text field beneath.
This is EXACTLY the kind of thing you can do yourself. Refer back to your old code if you need to, I can guarantee I will be. Remember though, you’re going to need a new route and controller action to POST this information to AS WELL as the route / controller action that you’ll GET…
Just something to consider hombre, good look.
Let’s compare notes.
First, let’s create a new, basic route to GET our profile edit page. Open up the routes.rb file and tap away on your keyboard device until the following appears:
# Existing route
get ':user_name', to: 'profiles#show', as: :profile
# New route underneath
get ':user_name/edit', to: 'profiles#edit', as: :edit_profile
Now that we have a route we’ll have to display a page! Let’s create the edit view.
Create a new file under the app/views/profiles folder and simply call it edit.html.haml or .erb (shame on you).
Remember what our simple view entailed, we just want a image picker and preview as our top row and a text field for the user’s bio as the bottom row. This could look something like the code below but as per usual, I highly recommend you attempt it yourself. If you’ve made it this far in the guide, you are more than capable! Use our old ‘edit post’ view for inspiration.
In app/views/profile/edit.html.haml:
.posts-wrapper
  .post
    .post-body
      .image-wrap
        = form_for @user, url: {action: "update"}, html: { multipart: true } do |f|
          .row
            .col-md-12
              .form-group.text-center
                %h4 Change your profile image:
                .img-circle
                  = profile_avatar_select(@user)
                = f.file_field :avatar, onChange: 'loadFile(event)'
          .row
            .col-md-12
              .form-group.text-center
                %h4 Update your bio:
                = f.text_area :bio, label: false, rows: 4
          .form-group.text-center
            = f.submit "Update Profile", class: 'btn btn-success'
Not too tricky to comprehend, right? We have two rows for our form, where we refer to an instance variable, @user. You’ll notice a new helper method, profile_avatar_select in there, but we’ll get to that in a moment.
We have our form basics, let’s quickly add a few lines of css to our app/assets/stylesheets/application.scss file:
#user_avatar {
  margin: 20px auto;
}
Lovely.
Let’s now create the required @user instance variable in our profiles controller under the ‘edit’ action now in order to avoid inevitable errors.
What are we referring to in this form? Just the user object, right? With the form, we just want to be able to update two specific parts of the user object, the bio and the avatar. Let’s point @user to the specific user object. Create an edit action in your profile controller like so:
def edit
  @user = User.find_by(user_name: params[:user_name])
end
So we have an action in our controller with an instance variable pointing to the appropriate user object and a form in our view. Now all we need is to actually have ‘bio’ and ‘avatar’ columns in the database for our users to update!
We’ll tackle the avatars first.
So far in our Instagram build, we’ve used the fantastic Paperclip gem to handle our file uploads (images in this case), and we’ll keep utilising it for our avatars now.
Checkout the great docs over at github and implement it for yourself! Take particular notice of the ‘Models’ and ‘Migrations’ sections.
Here’s how I added avatars to my User model. In my terminal, I tapped away:
rails generate paperclip user avatar
And then I jumped into my User model found at app/models/user.rb and added the following lines:
has_attached_file :avatar, styles: { medium: '152x152#' }
validates_attachment_content_type :avatar, content_type: /\Aimage\/.*\Z/
That should be it for the moment (until I migrate the changes to my DB). Let’s now add a user bio to the model.
Here’s your challenge, should you choose to accept it.
Add a new text column to the users table that we’l use for our bios. Call it ‘bio’.
Do it all by yourself.
For extra points, generate the full migration in your terminal so you don’t have to adjust the migration file itself before running the migrate rake task (which we’ll do in a moment). Pro-tip: Read the Rails docs re: migrations.
Here’s the goat for inspiration.
You did it yourself, right? Superb. Just in case you’re suffering a bad case of the nerves, here’s the exact line to generate the migration file from scratch:
bin/rails generate migration AddBioToUsers bio:text
Now let’s run our migration so that our changes are put into effect.
bin/rake db:migrate
New columns successfully created! Last but not least, let’s create the new profile_avatar_select helper method within our edit form. Spoiler alert, it’s incredibly similar to our old helper method we used when creating and editing our image posts. Check out what that looked like and try to implement this yourself.
Here’s how my new method looks, it lives in the app/helpers/application_helper.rb file:
def profile_avatar_select(user)
  return image_tag user.avatar.url(:medium),
                   id: 'image-preview',
                   class: 'img-responsive img-circle profile-image' if user.avatar.exists?
  image_tag 'default-avatar.jpg', id: 'image-preview',
                                  class: 'img-responsive img-circle profile-image'
end
The functionality with this method is almost exactly the same as our older method. If the user already has an avatar, display that image. Otherwise, display the ‘default-avatar.jpg’ image. “What is this ‘default-avatar’ image?”, I hear you scream at your monitor. Well… You’ll have to create one.
Whatever default image you decide to use, make sure it’s a sensible size and make sure it’s named ‘default-avatar.jpg’. Pop it in the app/assets/images folder.
Now! Revisit your ‘edit profile’ view and you should be faced with a lovely little form. Oh wait, you’re faced with an error complaining about no ‘update’ route. Lame.
Think about it, what are we actually submitting to? What’s going to do the work with our lovely new information (bio and avatar)? How would this work with any other form?
We’re going to need a new action in our Profiles Controller to handle the submitted form AND we’ll need a route to submit the form to. Let’s get to it.
Route first.
Sticking with our theme of creating nice little routes, let’s create a new route for our ‘update’ profile action.
In your config/routes.rb file, add this line:
patch ':user_name/edit', to: 'profiles#update', as: :update_profile
We’re adding a PATCH route for :user_name/edit which points to a ‘update’ action in our profiles controller. So, it would make sense at this point to create our new ‘update’ action.
In your profiles controller, add the new action:
def update
end
Refresh your edit profile form and it should now actually present something! Hurrah!
Ensure that the image preview is working OK, and let’s continue with the form submission logic.
What happens if we submit our form now with an empty update action?
ERRORS GALORE
Of what variety? The ‘no template’ variety. We’ve had this particular error in the past articles and what it means is this: Make a template. What does it mean if you don’t want a template, just like our scenario? Our update action should simply update the user object on the server, not actually display anything to the user.
What we need to do is write some logic for saving our new data and then we’ll redirect the user somewhere useful with a nice old flash message displayed on success or failure.
Tap away on your keyboard until your update action in your Profiles Controller looks like this:
def update
@user = User.find_by(user_name: params[:user_name])
if @user.update(profile_params)
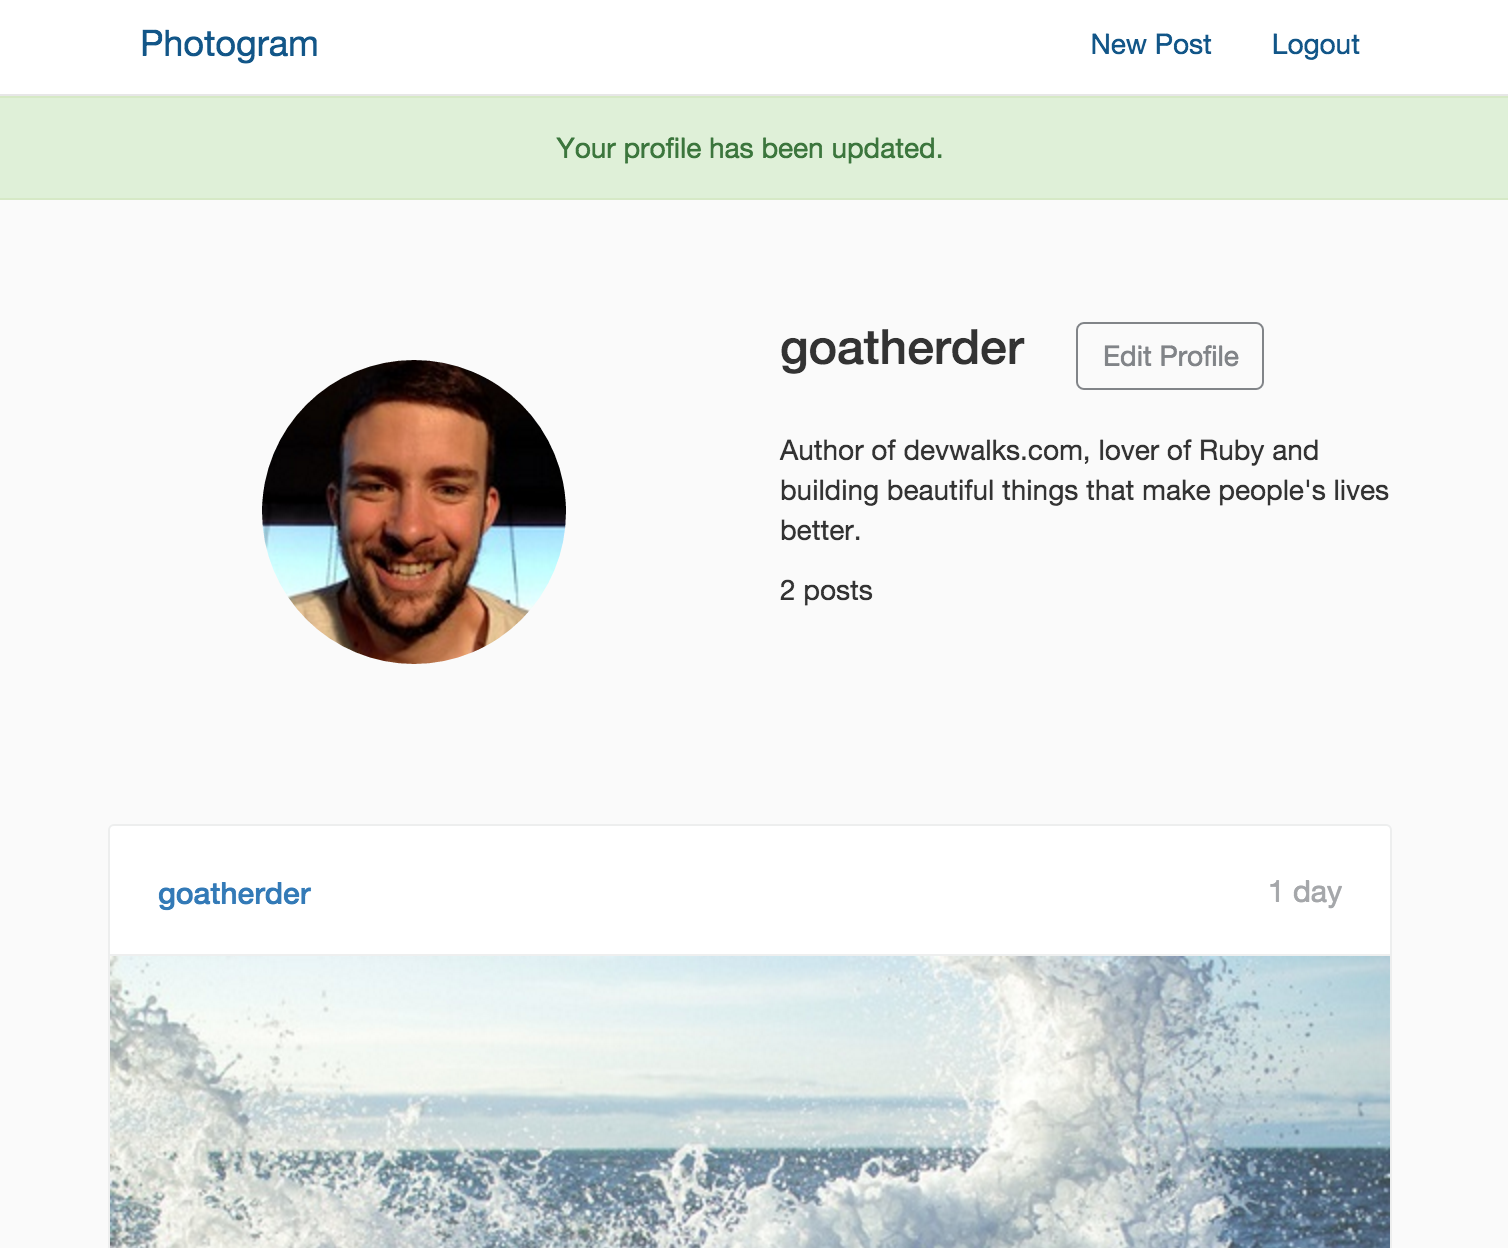
flash[:success] = 'Your profile has been updated.'
redirect_to profile_path(@user.user_name)
else
@user.errors.full_messages
flash[:error] = @user.errors.full_messages
render :edit
end
end
And add a new private method below our other actions in order to set context for profile_params used above.
private

def profile_params
  params.require(:user).permit(:avatar, :bio)
end
Let’s go through our update action one line at a time, if you know what’s going on here, feel free to move your eyeballs past the dot points below and give yourself a pat on the back for being so clever.
- We set the
@userinstance variable by finding their details via the url params (the user’s user name). - If we can update the user object with the profile params that are sent by our form, flash a victory message, and redirect the user back to their profile page.
- If something goes horribly wrong, flash an error message and render the edit page once again, with the user’s form entries intact.
What have we achieved here? Our users can now create and edit their profile data! Even if you didn’t skip the dot points, give yourself a pat on the back now and kiss the closest human being (with permission) to celebrate this wonderful moment.
But Ben, I still can’t see everyones avatar or bio!
Oh yeah, let’s fix that now by being clever!
You should do it yourself of course, but first, let’s think about what we want to achieve here.
The users active record object is already available with the @user instance variable that we’ve already set. All we want is to access the @user.avatar and @user.bio. At the very least, add the data to your profile pages and we’ll beautify it in a moment.
Remember, you’ll learn FAR more by doing it yourself, the struggle is key. Don’t disappoint goat, he’s very judgemental.
Let’s compare notes.
Here’s the quick and dirty way to get the user’s profile data (the avatar and bio) onto their profile page. Jump into the app/views/profiles/show.html.haml file and replace everything above the @posts.each do |post| block with this:
.posts-wrapper
  .row.profile-header
    .col-md-6
      .img-circle
        = profile_avatar_select(@user)
    .col-md-6
      .user-name-and-follow
        %h3.profile-user-name
          = @user.user_name
        %span
          - if @user == current_user
            = link_to 'Edit Profile', edit_profile_path(@user.user_name),
                                      class: 'btn edit-button'
      %p.profile-bio
        = @user.bio
      .user-statistics
        %p
          = pluralize @user.posts.count, 'post'
If you were to refresh your page now, you’ll be presented with our profile data! Add the following to your app/assets/stylesheets/application.scss file:
.profile-header {
  padding: 20px 0;
}

.profile-image {
  margin: 20px auto;
  height: 152px;
  width: 152px;
}

.user-name-and-follow {
  display: inline;
}

.profile-user-name {
  display: inline;
}

.edit-button {
  border-color: #818488;
  color: #818488;
  margin-left: 20px;
}

.profile-bio {
  margin-top: 20px;
}
And refresh! You’re profile page should be looking glorious.
Fantastic. We’ve not got fully functioning profile pages working for our users… but wait…
I can kind of edit everyone’s profile…
Even though we have some code in our profiles/show.html.haml view that only shows the ‘Edit Profile’ button if you’re the owner of a particular profile, let’s see what happens if we directly navigate to the url for editing another user’s profile?
We can edit it.
This is very bad for obvious reasons. Let’s fix now. If you have an elephants memory, you’ll recall that we fixed this very issue for our Posts feature as well in a prior article!
Check out your existing code and see how you could use a very similar feature here to protect our user’s profiles from tomfoolery.
Jump on into your app/controllers/profiles_controller.rb file and add a new private method as per the below code:
def owned_profile
    @user = User.find_by(user_name: params[:user_name])
    unless current_user == @user
      flash[:alert] = "That profile doesn't belong to you!"
      redirect_to root_path
    end
  end
Back at the top of that file, just below the :authenticate_user! you can add the before_action for our new method:
before_action :owned_profile, only: [:edit, :update]
If you’re testing, check your tests now. If you’re not, manually test a visit to the edit path for a different user. You should be denied access and you can therefore give yourself a high five.
We also want to make sure that only registered users can see our profile pages, so make sure you add the authenticate_user! before_action in your controller too.
Either above or below your owned_profile action, add:
before_action :authenticate_user!
Hell yeah.
Tidying Up
Notice anything fishy about our Profiles Controller. Maybe something looks a little… off?
We’re setting the @user instance variable constantly! How could we DRY up our code? Have a ponder or simply checkout how we handled it in our Posts Controller. We can tidy this right up very easily.
Once again, create another private method in your Profiles Controller. Simply call it set_user and make it look somewhat similar to the code below:
def set_user
  @user = User.find_by(user_name: params[:user_name])
 end
Add the before action for your new set_user method to the top of the controller file:
before_action :set_user
At this point you can go forth and delete all lines of code which we’ve handled by setting the @user instance variable with the before action. Your controller will look much nicer as a result.
Last but not least, let’s link up the user names shown on comments and captions to the appropriate user’s profile page. Try it yourself first, and report back to me once you’ve had a good try.
It’s super easy! First, let’s take care of linking up the user names shown in comments. Jump into your comment partial file at app/views/comments/_comment.html.haml. Adjust the dynamic user name line, so it looks like the third line shown below:
#comment
  .user-name
    = link_to comment.user.user_name, profile_path(comment.user.user_name)
Now, let’s fix the user name shown for each post’s caption. In the app/views/posts/_post.html.haml file, adjust line 16 (that once again shows the user name) to link to the profile page.
.user-name
  = link_to post.user.user_name, profile_path(post.user.user_name)
Check it out for yourself and bask in your own glory.
That’s it, for now
It was a pleasure e-seeing you again and I hope the pleasure was mutual. From now on, I’ll be maintaining a weekly post schedule and you can expect something from me every Thursday. If I run out of time, I’ll post a shit poem.
Remember, if you want to chat about an awesome project of yours and you’d like the build process and end product to be wonderful, send me an email at [email protected].
All the best my friend, keep on being awesome and keep on learning. If you want to be notified about future lessons or even whole new Let’s Build projects, throw your email address in the field below and hit that big ‘ol button.