Let's Build: Instagram with Ruby on Rails Part 7 - Follow all the people!
17 February 2016
Our social network is very social
So social, in fact, that every single user follows (and is followed) by everyone else! What a magical social network to be a part of.
Not everyone is happy though.
There are grumblings in the Photogram community that users want to pick and choose who they follow and therefore who appears in their feed! It might just be crazy enough to work…
Previously on Let’s Build Instagram
Part One - CRUD actions for our posts, each with an image and caption.
Part Two - User functionality with registration and sign-in forms. Also, Adding comments to posts via AJAX.
Part Three - We paginate our posts and comments and also create beautiful registration and login forms
Part Five (Step One) - Adding likes to our users posts.
Part Five (Step Two) - Magical liking, thanks AJAX!
Part Six - Notifications for all of the things!
Bonus Guides - The associated testing handbooks for Part One - CRUD & Part Two - Users & Comments.
A Brief History of Following
The model relationships that we’re going to discuss in this guide can be tricky to understand at first, just because it brings forward what I found to be an awkward way of thinking. Join tables.
Sure, now it makes sense to me, but I remember feeling quite overwhelmed the first time I was exposed to this idea.
Check out the Rails Active Record Associations Guide that runs through some of the associations you’ll use often. Pay special attention to those parts referencing the has_many, :through relationships because that’s what we’ll be dealing with today.
Please note that we’re also not going to easily be able to browse the whole user base in this guide in order to see who we want and don’t want to follow. What we’ll do is, list ALL of the posts on Photogram in one dashboard (similar to Instagram’s browse feature and exactly what we’ve been doing up until this point) and have our main news-feed only show the users that we follow.
Let’s Build It!
All talk and no play makes you, the reader, feel not so gay. So let’s go forth and build our functionality. We can discuss theory more as we go.
Here’s How it’s Works
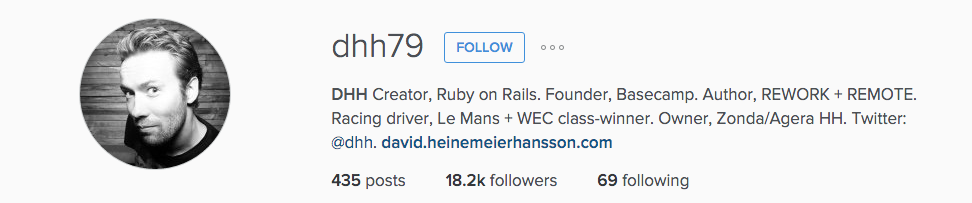
At the moment, our user’s profiles look like this:
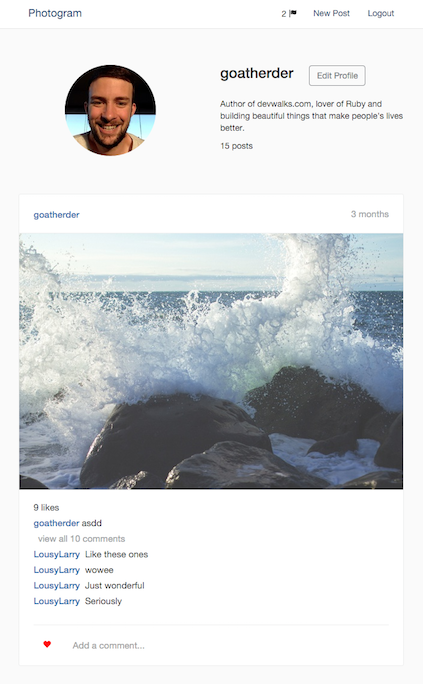
We can’t actually follow or unfollow a user from here, all we can do is gaze upon their wonderful selfies.
Where the ‘Edit Profile’ button is in the above screenshot (that’s my own profile), we’ll put a FOLLOW or FOLLOWING button, depending on our existing relationship. On clicking the ‘FOLLOW’ button, we’ll use an AJAX call to a follow_user controller action and the new relationship will be created. Upon success, we’ll use jQuery to transform the ‘FOLLOW’ button into a green ‘FOLLOWING’ button (we’ll also change the link at this point to point to an unfollow_user action, just in case).
We’ll also adjust our dashboard logic so we’re only showing posts from the users we’re following and also create a brand new dashboard that emulates our current system of showing EVERYTHING (so we can find new users to follow).
Phew, that’s quite a lot to build, let’s not waste any more time my friend, greatness awaits.
First, the Models & Relationships
It’s nice to get the models and relationships set up first. Once these are set up we can easily test relationships in the Rails console that will then convert directly into beautiful logic in our application!
Let’s go over what our model relationships will look like:
- A user
has_manyusers that they’re following (those users whose posts will show up on your primary dashboard). - A user
has_manyfollowers who are also users (the followers will see the users posts on their primary dashboard).
Easy enough right?
Sure is! The complexity is in how you model this data in the background. Think about it like this. Imagine we just had the user model. How would we refer to both the following users and the user’s followers (think in terms of referencing id’s in the database columns)?
You couldn’t have a separate column for each relationship, that’d be madness. That’s where a join table comes in handy. The join table simple references a model to another model, or in this case, a model back to itself. Let’s imagine it this way:
There’s a record for a user, whose id is 1. The user is following users with the id’s of 4, 7 and 12. By creating a separate join table, we can reference a relationship between these users. The join table can have two columns, following_id, follower_id.
The follower_id in the above scenario would be 1 for all three records and the following_id would be 4, 7 and 12 respectively. Once the relationships are setup nicely in Rails, we could then simply refer to those users we’re following with:
@current_user.following
In the opposite direction, imagine that the user with the id of 1 is followed by users 2, 3 and 10. The following_id is 1 in each of the three records and the follower_id would be 2, 3, and 10 respectively. To retrieve the records of the user’s followers:
@current_user.followers
If this hasn’t sunk in yet, do not fear. It may take time. As I’ve mentioned previously, this sort of relationship made me quite uncomfortable for an extended period of time. Hopefully your brain is better aligned and it’ll click for you sooner! Perservere and you’ll be ok in the end I promise.
Making things happen
Let’s generate some migrations for the above relationships. Jump into your terminal and tap away the following:
rails g migration CreateFollowJoinTable
Once complete, pop into the migrations folder in your project and open up your newly created file.
What you want to do at this point is to create a table that has two integer columns, one called following_id and the other called follower_id. You also want to make sure that both columns have an index and that the combination of both columns in new records MUST be unique.
Call the new table ‘follows’.
Give it a go now! Use your google-foo if you must.
Here’s my complete migration file for comparison:
class CreateFollowJoinTable < ActiveRecord::Migration
  def change
    create_table 'follows' do |t|
      t.integer 'following_id', :null => false
      t.integer 'follower_id', :null => false

      t.timestamps null: false
    end

    add_index :follows, :following_id
    add_index :follows, :follower_id
    add_index :follows, [:following_id, :follower_id], unique: true
  end
end
Starting from the top, we’ve called our table ‘follows’, and the created two integer columns that may not be false. We add some timestamps for good measure. Below this, we add an index for model columns and then make sure the combination of the two in a new record must be unique.
Go forth and run the new migration in your terminal:
rake db:migrate
Perfect! Give yourself a high-five and once complete, we’ll finish of our setup.
First, we want a new model called Follow. This will reference our follows table implicitly and will let us create our user relationships.
In the terminal run:
rails g model Follow
Open up your new app/models/follow.rb file and edit it thusly:
class Follow < ActiveRecord::Base
  belongs_to :follower, foreign_key: 'follower_id', class_name: 'User'
  belongs_to :following, foreign_key: 'following_id', class_name: 'User'
end
We’re explicitly stating our relationships here, rather than the usual Rails way. We’re stating the class that the foreign key is associated with and also giving it name of either ‘follower’ or ‘following’. Finally, let’s adjust our User model to suit.
Once open, you’ll want the new relationships in your user model to look like:
  has_many :follower_relationships, foreign_key: :following_id, class_name: 'Follow'
  has_many :followers, through: :follower_relationships, source: :follower

  has_many :following_relationships, foreign_key: :follower_id, class_name: 'Follow'
  has_many :following, through: :following_relationships, source: :following
Alright…
Some pretty wild things are happening here so let’s go through them.
Our first has_many line gives us the ‘follows’ relationship objects where the user is being followed. The next line goes the next step and accesses a user’s followers through those relationships (we’re accessing the actual user data at this point).
The second two lines is the same but for the ‘following’ relationships (those who the user is following, in order to see their posts).
It’s one of those things that can be easier to understand by playing around in the console.
Make sure you’ve saved the above relationships in your User model and then open up your Rails console. Let’s see how this all works.
The below assumes you have users with the id of 1, 2 and 3. If you don’t, just use what you have.
# create a new follow relationship where the user
# with the id of 1 follows the user with the id of 2
Follow.create(follower_id: 1, following_id: 2)
# create another for good measure with a different user
Follow.create(follower_id: 1, following_id: 3)
# Now, let's create a relationship where the user with
# the id of 1 is being followed by a user with the
# id of 3
Follow.create(follower_id: 3, following_id: 1)
# Now, let's see how our relationships work.  First,
# find the user who we created relationships for.
u = User.find 1
# List this user's followers
u.followers
# List the users this user is following
u.following
# calling follower_relationships on the user will list
# the relationships we've created in the follows table
# where the user is being followed by other users
u.follower_relationships
# calling following_relationships on the user will list
# the relationships we've created in the follows table
# where the user is following other users
u.following_relationships
If you’re anything like me, the words ‘following’ and ‘follower’ have lost all meaning at this point and you probably need a coffee.
The point is…
The words and labels aren’t important (words and labels are incredibly important in programming, but for the sake of understanding these relationships, it’s not), it’s how we’re linking our data that’s important. By creating relationships in the ‘follows’ table between two users, we can create the schema we need in order to build our functionality.
We can make it even nicer to achieve the creation and destruction of relationships by adding some simple methods to our User model. It’d be great if we could simply call current_user.follow user_id or current_user.unfollow user_id within our controller. Let’s write the simple methods to achieve that now.
def follow(user_id)
    following_relationships.create(following_id: user_id)
  end

  def unfollow(user_id)
    following_relationships.find_by(following_id: user_id).destroy
  end
That was some heavy stuff
And I’m sorry. Only time and practice will help you with these concepts.
Let’s move on anyway and start building some relationships between our uses within the application itself.
First, let’s create a ‘follow’ button that will sit in our user profiles. Within app/views/profiles/show.html.haml, add our new -else option:
  %span
    - if @user == current_user
      = link_to 'Edit Profile', edit_profile_path(@user.user_name),
                                class: 'btn edit-button'
    - else
      = link_to 'Following', unfollow_user_path,
                             remote: true,
                             class: 'btn unfollow-button',
                             id: 'unfollow-button',
                             method: :post
This is only temporary, we’ll want to show an ‘unfollow’ button for those users who we’re already following, but this will do for the moment (follow_user_path also doesn’t exist yet but we’ll fix that in a moment as well).
Next, we’ll add some styling in our app/assets/stylesheets/application.scss file:
.follow-button {
  text-transform: uppercase;
  border-color: #4090db;
  color: #4090db;
  margin-left: 20px;
  &:visited, &:focus, &:hover {
    border-color: #2D6396;
    color: #2D6396;
  }
}

.unfollow-button {
  text-transform: uppercase;
  border-color: #66bd2b;
  background-color: #66bd2b;
  color: white;
  margin-left: 20px;
  &:visited, &:focus, &:hover {
    border-color: #47821F;
    background-color: #47821F;
    color: white;
  }
}
Note we added the styling for the ‘unfollow’ button as well (we’ll add it soon enough).
Check it out!
Let’s make it do something now.
First, we’ll need to decide where we want to add the ‘follow’ and ‘unfollow’ functionality. It’s tempting to use our existing profiles_controller but the functionality isn’t really profile focussed. Let’s separate the functionality into its own controller.
rails g controller Relationships follow_user unfollow_user
We could call this controller ‘Following’, ‘Followers’ or so on but relationships seems to make sense. Feel free to call it what makes sense to you.
Generating the controller with the above command, also creates some new routes for us. Quickly adjust them now to give them a name and add a reference to the user name of the user we want to follow or unfollow.
  post ':user_name/follow_user', to: 'relationships#follow_user', as: :follow_user
  post ':user_name/unfollow_user', to: 'relationships#unfollow_user', as: :unfollow_user
Lovely! We’ve created ourselves a nice looking pair of routes that will do the job perfectly.
Time to add some logic to the follow_user and unfollow_user actions in the relationships_controller.rb file.
You should… give it a go yourself!
Here’s how to think about it:
- First, find the user we want to follow or unfollow via the
:user_nameparameter in the url. - Create a new relationships between the
current_userand the user we found in step one using our new User methods. - If the method call is successful, respond with some javascript that will change the class of the button to ‘btn unfollow-button’, the text of the button to ‘Unfollow’ and the link of the button to either ‘unfollow_user’ or ‘follow_user’ depending on which action you’re working on.
- Go ahead and do the same for the
unfollow_useraction. - Make sure your profile view is showing the unfollow button for users you already follow and the follow button for users you don’t yet follow.
Here’s why you can do this yourself:
- You’ve already implemented something similar to Step One in our previous Profiles article.
- You’ve already played with building relationships earlier in this article when we were mucking about in the Rails console.
- You’ve responded to saving data with javascript in the Comments AND Likes articles.
Basically, you already know what to do! Seriously though, give it a go yourself. The struggle will make you better. Be better and embrace the struggle.
How’d you go? Let’s compare notes…
Here’s my RelationshipsController:
class RelationshipsController < ApplicationController
  def follow_user
    @user = User.find_by! user_name: params[:user_name]
    if current_user.follow @user.id
      respond_to do |format|
        format.html { redirect_to root_path }
        format.js
      end
    end
  end

  def unfollow_user
    @user = User.find_by! user_name: params[:user_name]
    if current_user.unfollow @user.id
      respond_to do |format|
        format.html { redirect_to root_path }
        format.js
      end
    end
  end
end
Hopefully this makes sense to you at this point. We find the user who owns the profile and then assign them to the @user instance variable. If the current_user.follow method is successful, we then respond with some javascript (our link has the property remote: true).
We pretty much follow the exact same route for the unfollow_user action but call the current_user.unfollow method instead.
Now that the controller actions are responding with javascript, we can create those new javascript responses in our views/profiles folder.
Here’s follow_user.js.erb:
$('#follow-button').attr('class', 'btn unfollow-button')
                   .text('Following')
                   .attr('href', "/<%= @user.user_name %>/unfollow_user")
                   .attr('id', 'unfollow-button');
And here’s unfollow_user.js.erb:
$('#unfollow-button').text('Follow')
                     .attr('class', 'btn follow-button')
                     .attr('href', "/<%= @user.user_name %>/follow_user")
                     .attr('id', 'follow-button');
Last but not least, let’s add some logic to our profile view in app/views/profiles/show.html.haml. Make sure your view looks something like below:
%span
- if @user == current_user
  = link_to 'Edit Profile', edit_profile_path(@user.user_name),
                            class: 'btn edit-button'
- else
  - if current_user_is_following(current_user.id, @user.id)
    = link_to 'Following', unfollow_user_path,
                           remote: true,
                           class: 'btn unfollow-button',
                           id: 'unfollow-button',
                           method: :post
  - else
    = link_to 'Follow', follow_user_path,
                        remote: true,
                        class: 'btn follow-button',
                        id: 'follow-button',
                        method: :post
You’ll notice the current_user_is_following helper method in the view above. Here’s how that could look in your profiles_helper.rb file:
module ProfilesHelper
  def current_user_is_following(current_user_id, followed_user_id)
    relationship = Follow.find_by(follower_id: current_user_id, following_id: followed_user_id)
    return true if relationship
  end
end
As of now, you should have a completely functional Follow / Unfollow button that correctly creates and destroys relationships in our application!
Congrats! If I was there in that room with you I’d give you a high five, followed promptly by a cuddle, followed promptly by our secret handshake. I love our handshake, especially that little flair at the end.
You know the one.
Let’s go forth and adjust our news feed now so it only shows the posts of the users who we follow.
Selective Selfies
Up until now, we’ve been seeing ALL of the posts ever created by ALL users on our news feed. It was a far too social feature of our social network.
If we check out the index action in our PostsController we can see why:
def index
  @posts = Post.all.order('created_at DESC').page params[:page]
end
We’re loading ALL of our posts, ordering them and paginating them. Let’s add a scope to our Post model so we can easily show only the posts for the users we’re following.
Open the app/models/post.rb file and add the following line:
scope :of_followed_users, -> (following_users) { where user_id: following_users }
This let’s us adjust our index action now:
def index
    @posts = Post.of_followed_users(current_user.following).order('created_at DESC').page params[:page]
end
Now, go back to your browser and refresh….
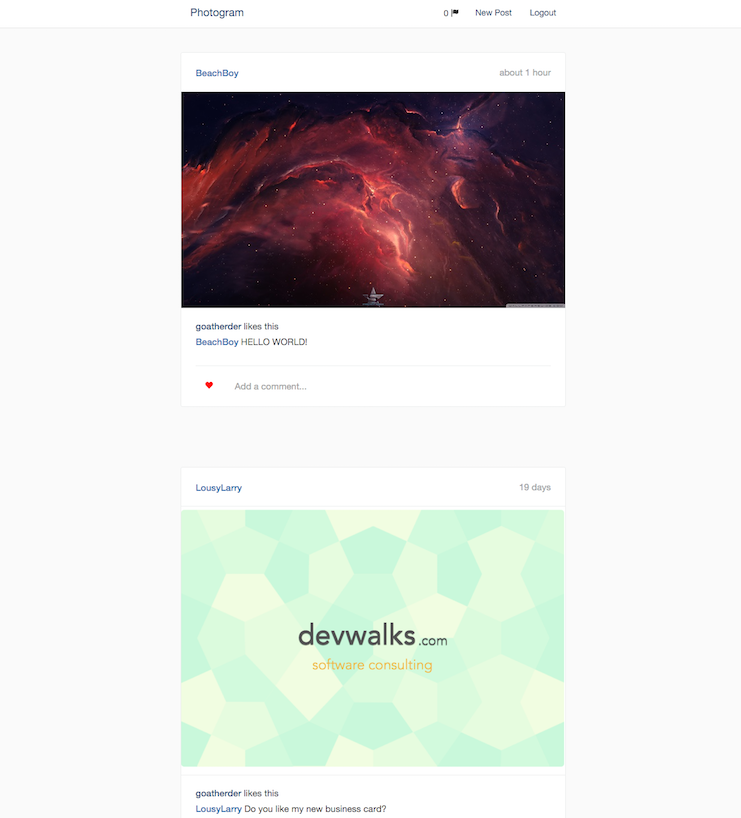
We now have a filtered feed!
Let’s find new users to follow
What we’ll do to finish this guide is to make sure that our wonderful users can browse ALL other posts (just as they were before) in order to find new and exciting users to follow.
All we’ll do is create a new action in our post controller called browse, create a new associated view, and update our navbar to have a link to the browse view.
Go on, give it a go yourself! Here’s a hint, this functionality is EXACTLY what we were doing before! The only difference is that you’re creating a new controller action and a new view.
Here’s one more hint:
The new view and the old index view are going to be very similar. What if we created a new partial view that they could both render?
Create a new partial view called _post_dashboard.html.haml. Copy over all your haml from your index view into the new view.
#posts
  = render 'posts'

#paginator.text-center
  = link_to_next_page @posts, 'LOAD MORE', remote: true, id: 'load_more'
Now, create a new javascript partial view called _post_dashboard.js.erb and copy over all of the logic from the index.js.erb file.
$('#posts').append("<%= escape_javascript(render 'posts')%>");
$('#paginator').html("<%= escape_javascript(link_to_next_page(@posts, 'LOAD MORE', remote: true, id: 'load_more'))%>");
if (!$('#load_more').length) { $('#paginator').remove(); }
Wonderful! Now you can delete your old index.js.erb file and replace your index.html.haml view with this lonely little line:
= render 'post_dashboard', posts: @posts
So now we’ve got a new partial and the index view is working just as it was. Let’s add our new browse action & view.
First, create the new action in your posts_controller.rb file.
def browse
  @posts = Post.all.order('created_at DESC').page params[:page]
end
That code looks familiar!
Let’s now create our new view at app/views/posts/browse.html.haml:
= render 'post_dashboard', posts: @posts
Which also looks familiar…
Let’s make sure we have a route for our new view & action. In your routes.rb file, add the following line:
get 'browse', to: 'posts#browse', as: :browse_posts
Last but most certainly not least, let’s make it easy for our users to browse all posts. Let’s add it to our app/views/layouts/_navbar.html.haml view.
- if user_signed_in?
  %li
    = render 'notifications/notification_dropdown'
  %li
    = link_to "Browse Posts", browse_posts_path
  %li
    = link_to "New Post", new_post_path
  %li
    = link_to "Logout", destroy_user_session_path, method: :delete
- else
   %li
     = link_to "Login", new_user_session_path
   %li
     = link_to "Register", new_user_registration_path
Check it out for yourself. Restart your browser and you should see the feed of ALL of the posts, just as it was back in the old days.
Now let’s sit back and reminisce together…
Homework & the end of an era
There are a few features that would be lovely to have as part of photogram at this point. Some of them easier, some of them trickier. You should definitely try to build them all.
- I’d love to have the follower and following counts shown on each profile. How else can I tell who is popular?
- I’d love for my own posts to be shown on my dashboard too. How could I achieve that?
That should be enough for the moment. Once you’ve done those couple of things, you’ll have a pretty well rounded social network on your hands!
This article was the final in the “Let’s Build Instagram” series and I hope you’ve enjoyed the journey thus far. I’ve certainly enjoyed sharing it with you.
Despite the long breaks, questionable post consistency and occasional errors on my behalf, I’ve loved every step.
I’m open to suggestions on what you, my favourite reader, would like to see in the future of “Let’s Build”. Leave a comment below!
Also, in the next few days, I’ll be working on converting the Let’s Build Instagram series into a free pdf e-book. Sign up to my email list below for guaranteed access.
I wish you all the very best and hope to chat soon.
Ben